Tuesday 19 February 2013

Chuff Chuff Chuff... Fazzzzaaaak!

Hi, All!
Professor Shandy Tanglefoot's Over-Compensatory Death-Ray of Doom! (for humanitarian purposes only, obviously!)


Tonight's post comes to you from the not-so-solubrious surroundings of a motel in Auckland, where I find myself somewhat lacking in glue and plastic rod... So, I thought I'd just let you all see the little side-project that filled the last three days of my holiday last week.

A concept sketch I doodled months ago. I wasn't sure back then how I was going to go about this.

Bits of stuff, destined for greatness!

So, without further ado, let me introduce you to:

Professor Shandy Tanglefoot's Over-Compensatory Death-Ray of Doom!

And my, oh my, what fun this one has been!

An old drill, DVD, broken bracket, push-pins and cogs from a printer form the main body of the weapon.

You will no doubt recall the motor I stripped from an old drill and made the central feature of the core room of Lord Smudgington Smythely-Smythe's Hydraulically Motorvated Sextupedal Land-Traversing Vacational Domicile. Well, for this piece, I decided to put the drilly-end of the drill to good use.

A reflector from a broken light becomes the main body of the Death-Ray. Card strips, cogs from a correction tape, a piece of an old transformer and other bits quickly transform junk into a very cool machine!

The gun's focussing array starts life as a washer and the nozzle off a glue bottle. Brass wire, plastic tube, beads and crystals from a chandelier are used to build the array.

Standing the drill on its end and adding bits of junk was a wonderfully fast way of getting a very tall, very complex-looking structure. I glued a broken bracket to the top of it and started just sticking stuff on where it seemed to fit. Later on, this slap-dash approach caused a few painting issues (I should have painted a few bits before attaching them) but the speed with which things evolved really kept me enthused!

Legs and girders, boiler, planking and gun-mount are constructed. I chose plastic for the planking for strength. The woodgrain effect was easy to achieve using very heavy grade sandpaper.

The structure is carefully balanced together, prior to painting.

I wanted a steam-powered look for this weapon, as for all of my others, but whereas I have tended towards large locomotive-type boilers elsewhere (and huge for my ongoing Giant Walker project) I decided to be a bit silly and give the Death Ray a really tiny boiler. This, I constructed from plastic board and a piece of the inner tube from a receipt roll. A couple of cylinders were made from push-pins and sacks of coal were made from green stuff and pieces of grit.

The main structure is painted before other parts are fixed in place. Note the big side-panel and chimney, thrown together very simply from plastic board and rod.

Cogs and rivets abound! And a sheet of corrugated iron..?

If anything, the danger with a fast project such as this is the temptation to rush ahead at the cost of detail. I had to slow down and remind myself that the true value of a Weapon of Mass Delusion lies in its rivet count!

Boiler, gantry and really big cog, rivetted and painted.

The focussing array, painted. I am really happy with how this turned out!

Focussing array and gun, painted and joined. Loads of rivets and nice thick guitar-string-conduits add plenty of interest.

The main crystal shines within the reflector.

And so began a Super-Epic rivetting session...

Handrails and ladder are constructed from plastic tube, rod and sheet. Copper rings and painted jewelery chain are added. This was the fiddliest fiddly bit.

Gun and tower details. Some of my rivets have rivets. this is becoming a habit.

When it came to painting this monstrosity, I found myself a little limited. I have used a lot of red and green on other machines, and blue or yellow just didn't seem 'Death-Ray-ish' enough... So I went black and brass. I was worried that this might be a little too simple, but in the end, set-off against woodgrain, copper and a touch of greenery, it worked beautifully!

A drive-belt joins two massive, rumbling, rumbly things.

The underneath bits. Sacks of coal (sorry about the wet glue in-shot) cylinders, cogs, boiler and ladder.

Control levers, conduits, transformer and handrails.

The dastardly Professor Shandy Tanglefoot beside the dastardly weapon's dastardly controls!

Just because it's what I do: The Rivet Count for this ridiculous weapon is a whopping 1158 ! All done in a matter of a few hours' work. Not bad, if I say so myself...

A Hydrothermicopter's eye-view.

I have to say that this model is a definite favourite. I'm thrilled with how it has turned out and it's a great example of how a good piece of work can be simple, fast and fun to produce.

Faaaazzzzaaaaaaakkkkk!!!!

Let's just hope Her Majesty's forces can find and destroy it before lives are lost!

Next post: Back to Lord Smythely-Smythe's Hydraulically Motorvated Sextupedal Land-Traversing Vacational Domicile...

All the Best!

Sunday 10 February 2013

Cowboys And Engines

Hi, All!

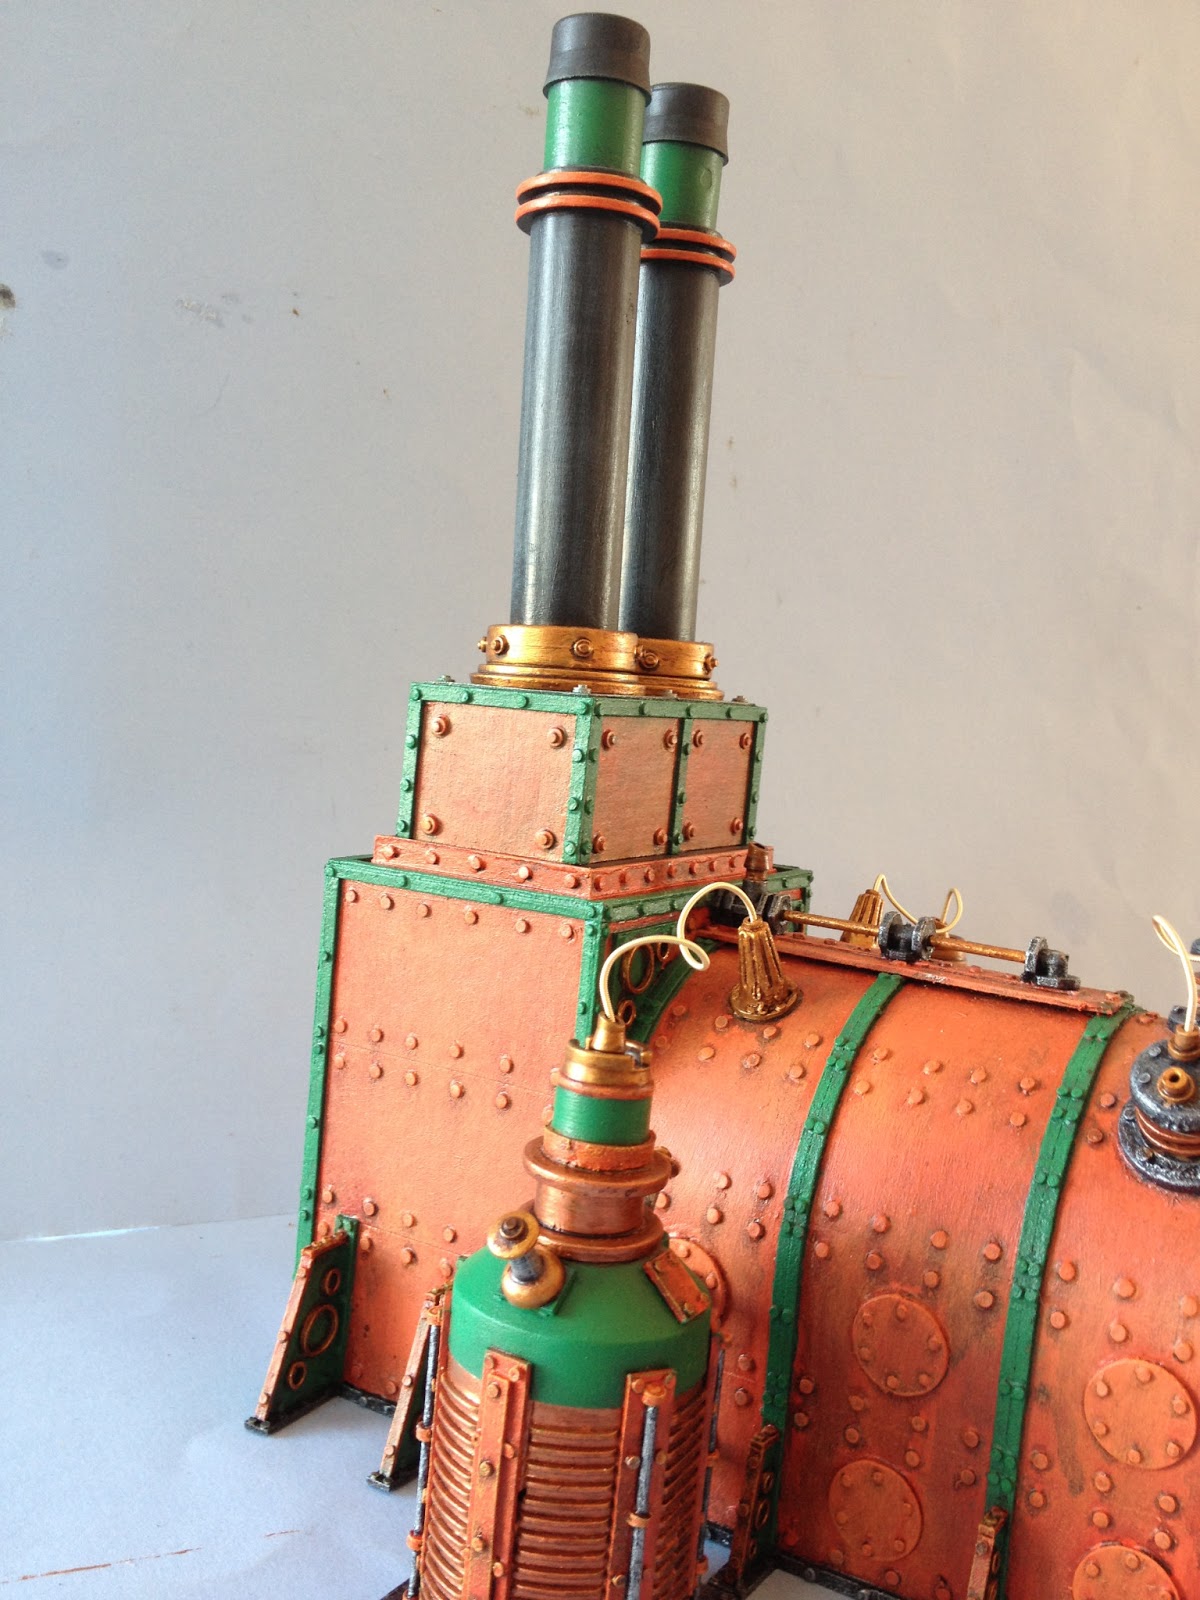
Lord Smudgington Smythely-Smythe proudly surveys the engine room.

Work on Lord Smudgington Smythely-Smythe's Hydraulically Motorvated Sextudpedal Land-Traversing Vacational Domicile continues apace with the addition of a massive wheel and chain, and the beginnings of the engine room floor.

Chain and spiky-wheel-thingummy

While organising my mountains of junk the other day, I came across a somewhat spiky wheel and a loop of metal chain. "Uncanny!" thunk I, "These are exact replicas of the chain-drive components of an 1878 Hydraulically Motorvated Sextudpedal Land-Traversing Vacational Domicile Engine! What luck!"

Chain, cog and wheel are laid out, and a rough schematic is sketched. From here, it is a relatively simple task to build a working structure.

Modfication of the wheel and cog begins. Of course, many rivets will be added later.

As luck would have it, the chain was a great length for the engine room without having to figure out how to take it apart, and I also found the original plastic cog to join it. I set about designing the componentry...

The engine is placed on a sheet of foamcore and the engine room is designed around it. At this stage, some changes are to be expected - this is just a guide for me.

A simple foamcore trench is constructed and the machinery is balanced in place to check it all fits.

I wanted the chain drive to be located in a trench in the engine room floor. For this purpose, I had to start designng the final layout of the engine room and cut a framework from foamcore. The final piece will start on the lowest of the three decks of the walker, while the chimneys tower above everything.

The trench is constructed and detailed with rivets, door and rounded channel (cut from a cardboard tube). A piece of balsa wood is inscribed and stained as floorboards.

The painted trench, in place and about to be closed-in forever. As with other parts of this model, some details may never be seen again.

With little more detailing than hundreds of rivets required for the machine parts, I decided the trench should receive a fair share of my attention. I constructed it as I would any other room of the vessel, applying panels, rivets and a bulkhead door. These are all in keeping with the design of the core room from my earlier posts. A balsa wood floor maintains the quasi-Victorian feel of the vehicle. (For the balsa detailing process, see my Old West Building Tutorial.)

Spiky wheel, rivetted and in place.

Cog and chain. The already dark metal chain had to be painted as dark metal so it looked real. Funny old world, innit?

Chain drive in place beside the engine.

The whole engine. Getting bigger every day...

From this point, it was just a matter of knuckling down to some serious rivetting. And I mean serious, folks! I can tell you, the glue-induced headache I developed over the next few hours required no fewer than six pints at the pub before it started to fade... Oddly, it was back this morning...

From above.

With rivets in place, it took a very short time to daub the components with paint and put it all together. And I have to say that I had my doubts right up until the final moment. Should I have painted the spiky wheel red? Are there enough rivets? Well, I needn't have worried. I'm really pleased with how this has turned out!

OK... Time for today's Rivet Count...

In an epic rivet cutting and gluing session, I added a massive 634 rivets to the wheel, cog and trench, bringing the grand total for the walker to 3,184 !

I shall soon pass the 3,630 of HMSW Gargantua... and I haven't even finished the engine room! And just in case you are having trouble picturing the eventual size of this vehicle, the picture below shows engine room and core room laid out relative to each other. Bear in mind that the core room will sit at the centre of the walker...

Engine room and core room. The dot in the middle is Lord Smudgington Smythely-Smythe.

"But wait!" I hear you cry, "What does any of this have to do with cowboys, Colonel?" Well, calm yourselves. There's no need for shouting. I shall explain...

Texas Ranger, with greenstuff goggles and a Flames of War British HMG.

As a little but of fun on the side, I decided to muck about with a Copplestone Castings Texas Ranger I'd had lying around. I liked the minature, but he never really struck me as 'Wild West Enough', having a tie and a slightly modern looking gun. Some time ago, I'd thought of giving him some sort of jet pack and got as far as sculpting some goggles and replacing his gun, but no further.

Inspired by bits of plastic, I started afresh.

Wings are drawn.

The first step was to re-pose the model and make a flying stand from a washer and a pin. I then laid the miniature on an offcut of plastic and constructed a wing framework.

The wings take shape. An engine is thrown together out of offcuts and rivets are added (of course!)

The plastic structure was cut out, all as one fairly fragile piece, and details were added. Carefully bending the plastic structure a little at its joints, I then cut pieces of brass foil into membranes and glued them into place one at a time, allowing the tension in the brass to spread and shape the wings further. This achieved an animated pose I wasn't expecting - and was very happy with!

The finshed wings. Simple and effective.

With the wings built, I made up some greenstuff, sculpted straps onto the miniature, and re-sculpted his tie to be flapping in the wind. A couple of beads and a piece of a plastic press-stud completed the gun. A bead and a blob of greenstuff made a nice little control rod in his left hand, to be joined to the engine wth a piece of guitar string.

Wings and miniature together. I didn't like the gun at this point - I wanted something  less like a machine gun.

Then he just had to be painted. This was also quick and simple, using mostly inks as usual.

Finished. And ready for action!

The wings and engine.

The finished gun, complete with a somewhat frightening chemical magazine... Because chemical weapons are ok, so long as they belong to the good guys, right?

Et Voila! Ladies and Gentlemen, I give you Tex Wingspan - The Flown Ranger! Fun, isn't he?

Next up: More on the engine room and Professor Shandy Tanglefoot's Over-Compensatory Death-Ray of Doom!

Tex Wingspan takes to the air!

All the Best!

Thursday 7 February 2013

The Absolutely Enormous Engine That Probably Will

Hi, All!

The engine nears completion...

I am nearing completion of the engine for Lord Smudgington Smythely-Smythe's Hydraulically Motorvated Sextupedal Land-Traversing Vacational Domicile, having added chimneys and two rather large Pole-Differential Potentialising Galvanetic Capacitors.

Bits of plastic tube, washers, castors and various bits and bobs will become the chimneys.

(Don't you just love technobabble?)

Two chimneys are very quickly thrown together and mounted on a simple box for added height.

Very soon, it will be time to construct the engine room around this enormous beast of a machine, and the gigantic walker will finally begin to take shape.

The box is edged with card strips and studded with rivets. And some of the rivets are studded with rivets! (This counts double for the rivet count, folks - my rivets, my rules!)

The chimneys were very easy to make, and I added a simple box of card for extra height. It is important that the chimneys tower over the finished vehicle, and I wasn't convinced that the engine was quite tall enough. Now, at approximately five storeys high, I'm happy that they'll be seen for miles around!


The box, painted and glued in place atop the engine.
The finished chimneys.

While working on the chimneys, I was also constructing the Pole-Differential Potentialising Galvanetic Capacitors. I wanted to 'bulk-up' the engine, to make it more than just a simple (if huge) steam engine. This is Victorian Science Fiction, after all... Spinny things, conduits, valves and techno-junk should abound! The capacitors are just the first of such gizmos. Keep watching!

Lampholders, washers, etc. form the basic shape.

The capacitors started life as two broken Edison-screw lampholders from the bin at work. I added washers, reels from the inside of a used Twink tape and the butt-end of a black marker to complete the shape. Push-pins and simple strips of plastic board and rod completed the detail. Oh yes, and many rivets!

Details are added (no rivets yet - be patient!) and the capacitors are mounted on squares of plastic board. Note the greenstuff repair work done to the right capacitor.

As yet, the capacitors have not been attached to the engine (neither has the furnace). They will have to wait until I have an engine-room floor to glue them to!

A completed Pole-Differential Potentialising Galvanetic Capacitor, before painting.
Left capacitor in place. Guitar-string conduit links it to the engine.

Right capacitor.

I have to admit, this engine has turned out even bigger than I had intended! Not that that's a bad thing in this case - I want Lord Smudginton Smythely-Smythe's Hydraulically Motorvated Sextupedal Land-Traversing Vacational Domicile to serve as an entire gaming table, so bigger is better. This is usually not the rule in model-making of course, so I'm finding all this rather liberating!

Capacitor and chimneys.

So: now I have to get on with constructing the engine room. This will involve gantries, valves, LED lanterns, ladders, steps, gauges, pipes... you get the picture. All will finally be enclosed with a removable 'glass' roof, based on the work of Joseph Paxton, designer of the Crystal Palace, amongst other things.

Having added a further 298 rivets since my last post, today's Rivet Count is...

2,550 !

Not bad, eh?

Another shot of the capacitor in place. Coz I can.

So there you go. That's it for now. I can't hang around blogging all day, by crikey! I've got rivets to apply!

Big, isn't it?!

All the Best!