Wednesday 16 January 2019

Opening New Doors...

Hi, All!

Before I get started on today's post, let me take this opportunity tell you that I am now on Instagram under "Colonel O'Truth's Miniatures" for those of you who would like to follow me. I shall be posting lots of pretty pictures on a regular basis!

I hope to see you there.

Anyway, on with the Stargate project!

Ready to see where this leads!

At last, several days later than I planned, my steam powered Stargate is complete! And I'm very happy with it, I must say!

When last I spoke at you, I had completed the main elements of the layout and was moving on to the finer details and smaller parts.

The first banister rail is added. 

Both rails in place and painted!

The first of these was the banister rail for the stairs. These I made from brass rod, with loops of plastic tube to connect to the uprights I'd already attached to the stairs. This was a relatively simple task but it really made all the difference when it was done!

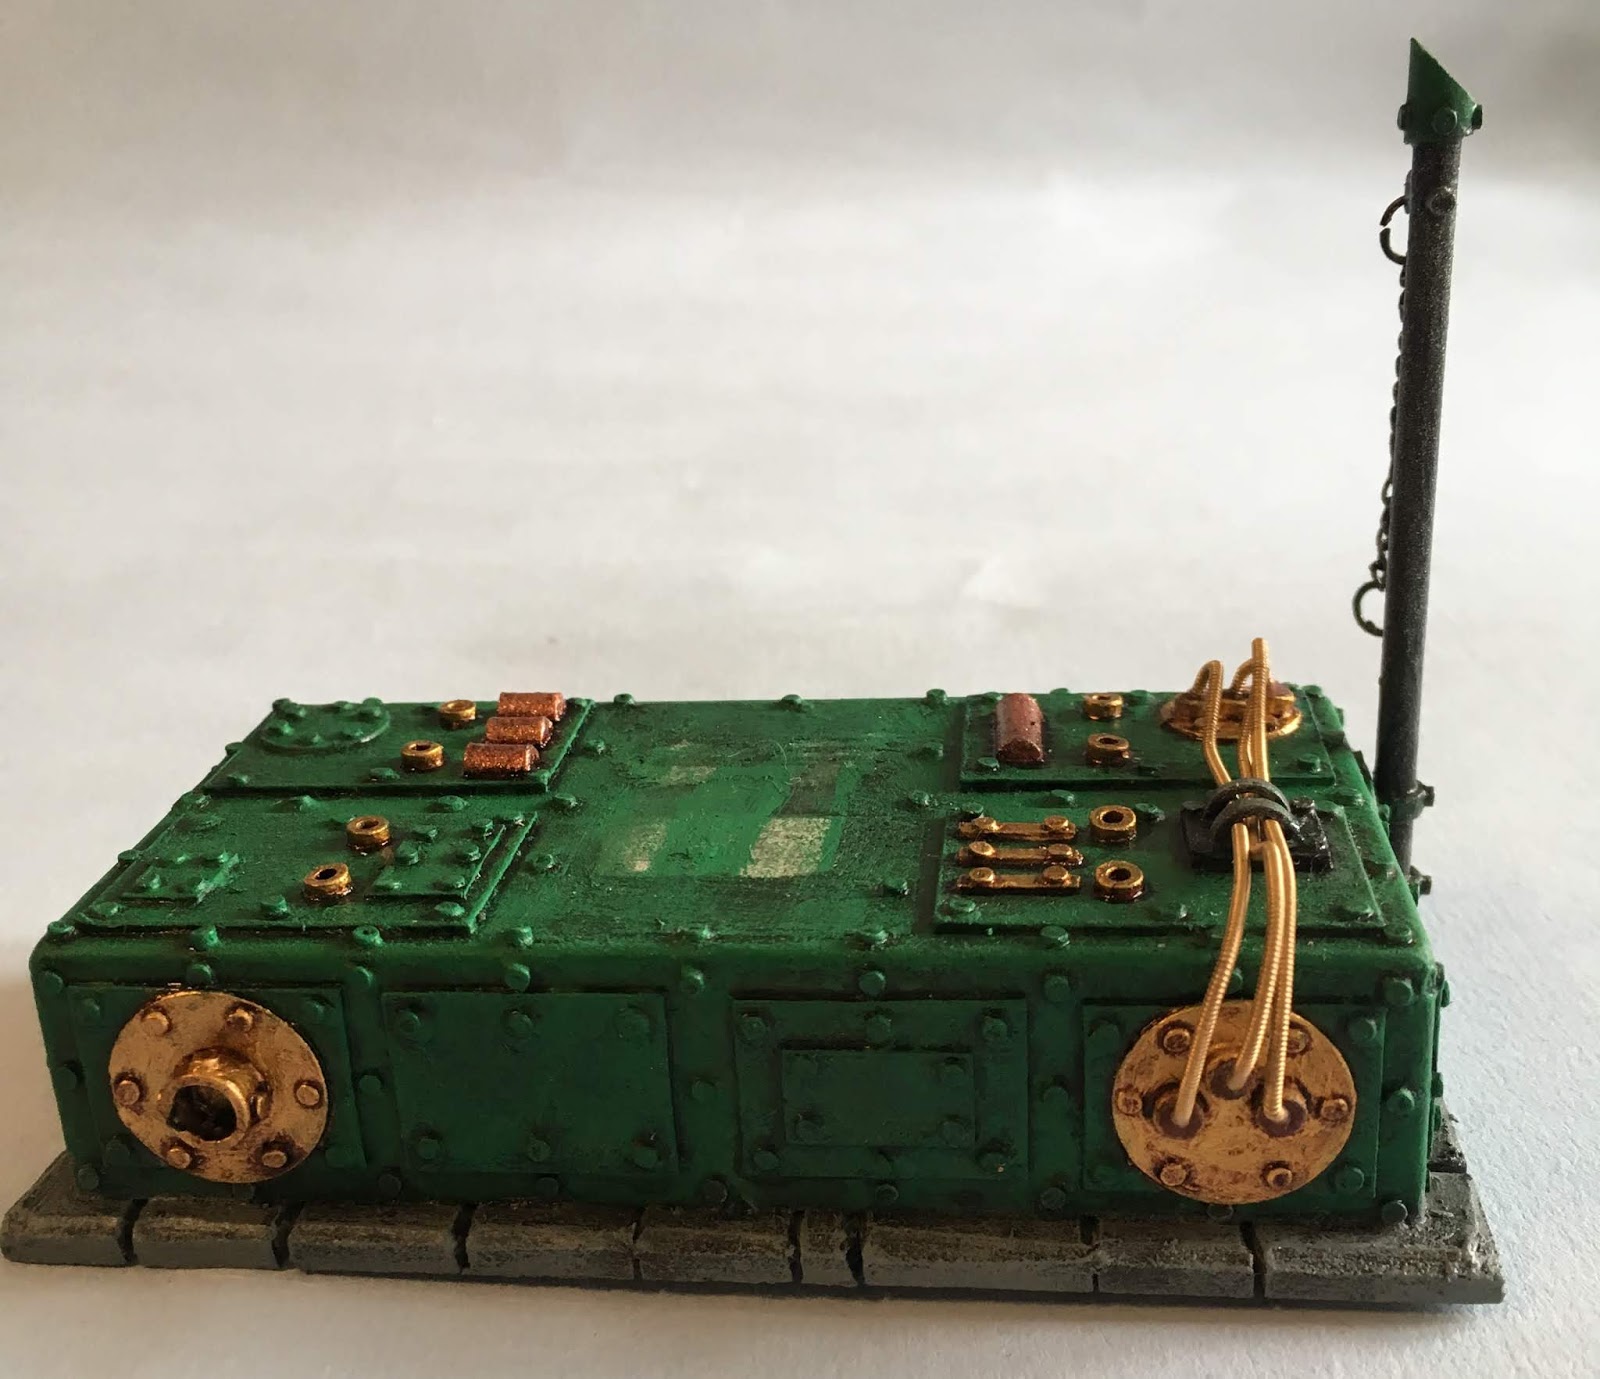
The controls... A bit boring, I felt.

The stairs done, I turned my attention to the control mechanisms. I admit, I had been putting these off as I really wasn't sure about the design I'd begun. No sooner had I started painting them than I realised they just looked a bit boring. And then it hit me...

"Magnets!" I shouted, scaring the cat. And lo, it came to pass.

Magnets are made from plastic board (and patched with green stuff where I made a wrong cut!)

Rivets! More rivets!
The finished controls, with guitar string cables.

I fashioned a couple of magnets in the same style as the ones I made for the Faraday Galvanic Field Gun, oh so many years ago! This also gave me the chance to add more rivets!

As I mentioned in my last post, I also wanted to add a coal bunker, and I wasn't happy with the base for the model, so I cut and detailed a new base from yet another discarded old vinyl record and a sheet of 5mm foamcore.

The basic parts of the coal bunker.

A very small shovel!

The finished pieces.

The coal bunker was really quick to make from a few off-cuts of plastic board, some scrunched up tissue paper covered with glue and gravel and lots of rivets, of course! I also had tremendous fun making a teeny tiny shovel to finish off the scene.

The finished coal bunker fills an empty corner of the base nicely.

Unfortunately, there was also a little bit of remedial work required. I had glued the Mysterious Shimmery Portal Bit into the gate with superglue, which had slightly frosted the acetate sheet with fumes. This would not have been too bad, but the accidental frosting allowed the ink wash on the green paint to bleed into the MSPB. Ugly. So I made a fresh MSPB, cut out the old one and replaced it using blobs of PVA. This is fine as it only needs to hold the (very light) acetate in place.

The spoiled MSPB (left) and its replacement (right)

And suddenly, I was ready to put it all together!

Nice big fat cables are added!

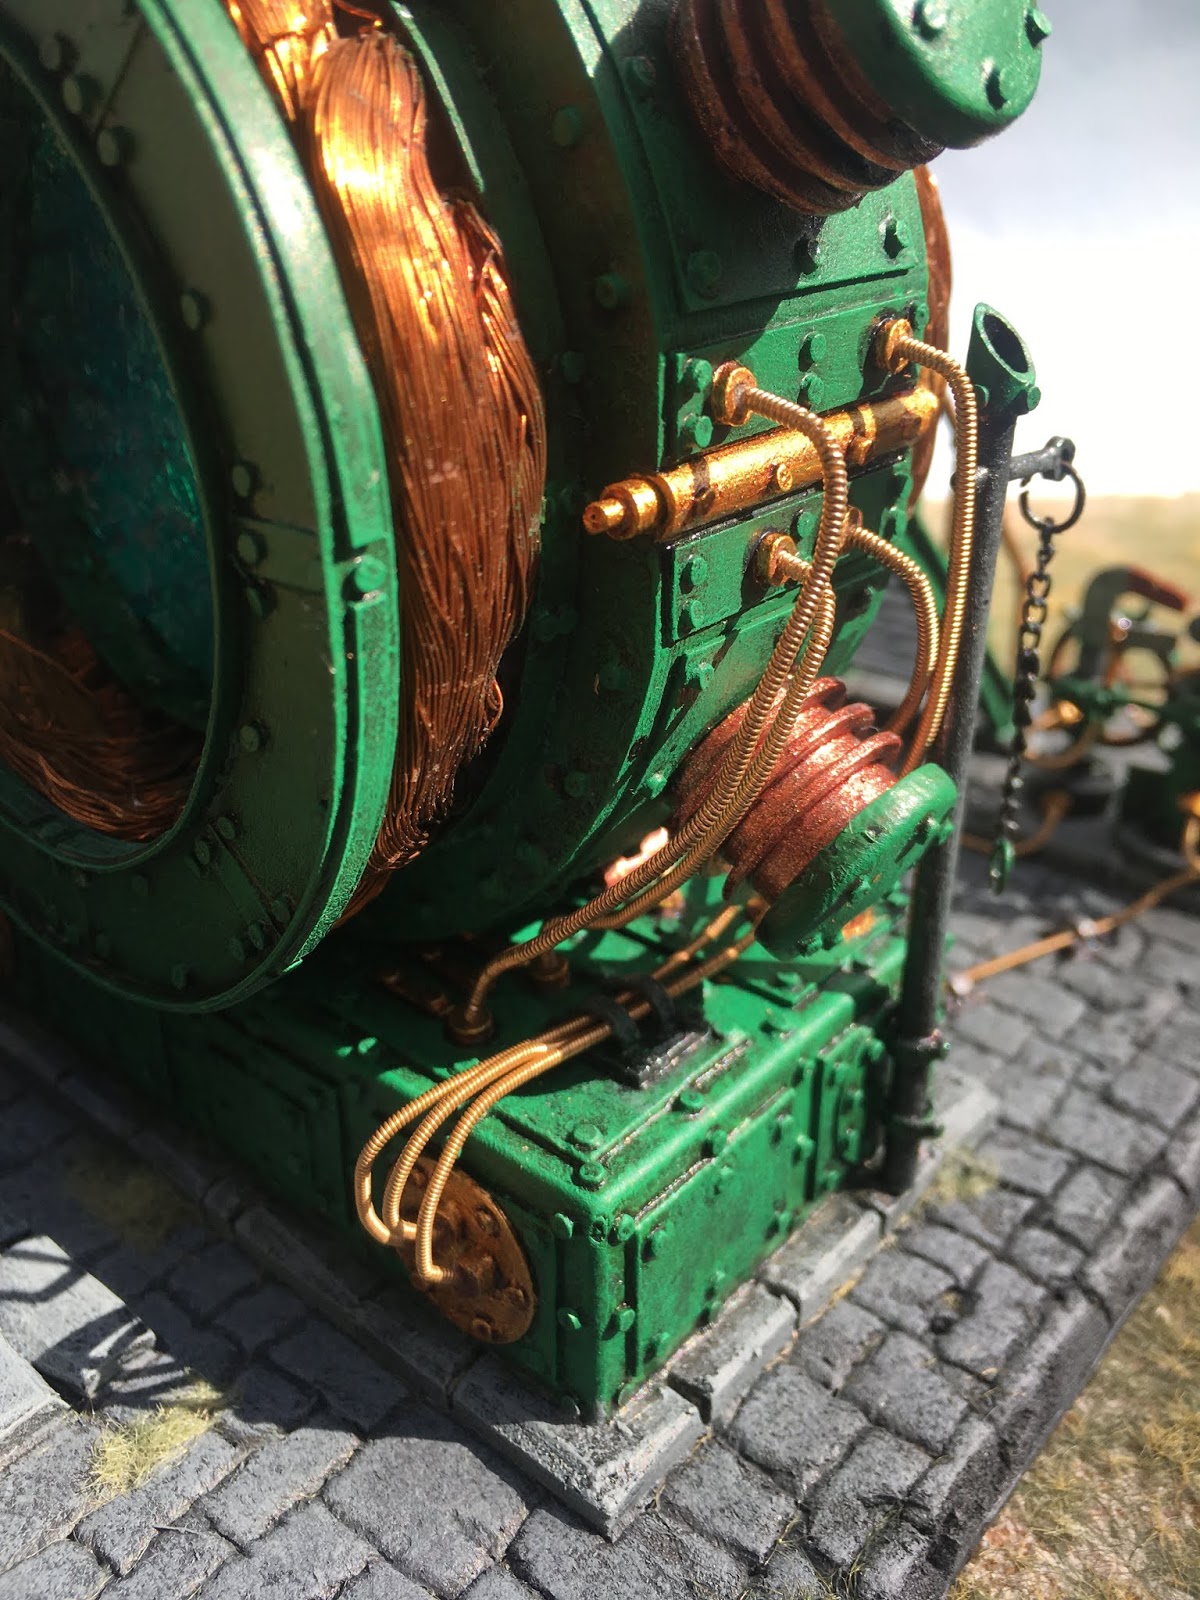
Once the main pieces were glued down, I added more guitar-string cables, along with some brackets I'd made to secure the cables to the ground. (Four rivets each! Adds up quickly!)

Cables and brackets link the controls to the rest of the machine.

Et, Voila! Who knew making a doorway between the stars was so simple?

Final Rivet Count for this beauty:

1,389 !

So with that all done, here are lots of nice pictures for your enjoyment! See you soon for my next creation, and of course the return of Lord Smudgington Smythely-Smythe's Hydraulically Motorvated Sextupedal Land-Traversing Vacational Domicile!


All the Best!

Wednesday 9 January 2019

Stairway To...

Hi, All!

A bit of an update on my steam powered Stargate project for you today, before I knuckle down and try to finish it!

The boiler, pipes and chimney, almost ready for final construction!

The last several days I've been getting the various components painted, in a (failed) effort to knock the bugger off before reality set in and I had to return to work!

Sigh... Didn't jolly well happen, did it? Oh, well. On with the post!

As you can see, this job has been fairly heavy on the green paint. I wanted something that looked heavy, and for me, nothing says "Victorian machinery" quite like a good dirty green paint job with plenty of brass.

Left to right: 1 coat of green, 2 coats, and with a dark wash.
Basic green on the stairs and the Stargate.

The process here was very simple. First, I painted practically all parts green, which required two coats as I didn't bother with an undercoat. Since this is essentially a terrain piece rather than a perambulatory wotnot, and therefore won't be handled a lot, I can get away with it. I wouldn't normally recommend it.

Dark wash on the plinth, and highlight on the chimney.

Having allowed the green to dry, each component was washed with a mix of 1 part black ink to 3 parts rust ink, and 8 parts water. This in turn was highlighted with the original green again. Of course, I could have highlighted further with a brighter green or even yellow, but I want this to look really solid, grimy and imposing. The metalwork will add brightness.

The finished plinth has plenty of brass and copper components to add interest.

Brass area were painted gold - again two coats - and then washed with a nut brown ink. Black areas were painted black (two coats) then lightly highlighted with dark grey, followed by a very light dusting of silver. There are also a couple of small copper components - but there will be more about the copper when I finish the gate itself.

I also started to add my favourite extra bits - guitar strings as cables. These were carefully bent into shape with pliers and glued with just a tiny drop of superglue at each end. The bronze looks gorgeous and doesn't need to be painted at all. There will be plenty more on the final piece!

Bronze wound guitar strings are added.

The stairway itself and the mesh walkway were painted separately then glued together. Only now can I start putting the hand rails together.

I rather like my little brass circle details!

Ready for hand rails.

With the main components ready to glue into place, I will now turn my attention to finishing the Stargate and controls, and the handrails for the stairs. I also want to add a coal bunker for the boiler, and I'm not happy with the base - so that will have to be redone before the final construction can be completed.

Boiler and chimney

Boiler and chimney again

All in all I think that's looking rather splendid! More soon!

Time to finish this beast!

All the Best!

Saturday 5 January 2019

Putting It All On The Record

Hi, All!

The full setup for my steam-powered Stargate.

A bit of an epic post for you today, as I've been rather busy since my last post! All of the components are now complete, festooned with rivets and ready for painting. So... Without further ado...

The Stargate piece is made up of a number of components: the gate itself, the plinth for the gate, the chimney, the engine, steps and walkway, a decorative base, some pipes, the control mechanisms and the Mysterious Shimmery Portal Bit. Each was built and detailed separately.

A record is cut to shape.

In order to get things arranged properly, I had to plan the layout and build a base for the model. As with previous projects, I opted to use an old vinyl record I picked up at the local tip, however I decided this time to cut it into shape, rather than having a great big circle. This was far easier than I expected - a few scores with a sharp knife and the vinyl broke apart very neatly.

Details are hand drawn into foamcore with the paper removed.

Having cut the vinyl, I overlaid it with a piece of 5mm foamcore board, marked out and cut around where I wanted my main components, then peeled off the paper on one side and proceeded to draw stonework by hand with a soft pencil. Finally, the edges were shaved at an angle and the whole outline coated with PVA and grit.

A framework is made from plastic board.

Steps are laid using balsa spacers. 

For the stairs and walkway, I used 4mm strips of plastic board to build a framework, then carefully laid in steps using balsa wood offcuts as spacers. These will not stick to the poly cement I use, and so can be pulled back out again easily. A top layer was made separately, incorporating a piece of fine wire mesh. The various parts will be painted before assembly.

The steps and walkway before painting.

A new item that was required was the control mechanism - I had actually totally overlooked this as I began this model! So, I went for a bit of a rummage, gathered up a handful of likely looking bits and bobs and started gluing things together. It took only a few minutes to complete but I reckon with a coat of paint and some wiggly cables the controls will look great - they even have a spinny thing!

A watch mechanism and various bits and bobs make up the controls.

Up until now, I had not paid much attention to the gate itself, and this turned out to be a bonus, as I happened upon some stoppers of a type I had used before in a local craft store. "Those doohickeys, Colonel," I told myself, "will make ideal zappy-coil-thingumabobs!" And so they did...

The gate and bottle stopper doohickeys.

"But what about that Mysterious Shimmery Portal Bit?" I hear you cry. Well...

Acetate and gunky stuff, while wet...

The MSPB was great fun, and really easy! I started with a sheet of plain acetate film, onto which I drew a larger circle than would eventually be needed, just as a guide. I then generously smeared this with Woodland Scenics Water Effects, added a couple of drops of gamma green acrylic ink and stippled the mix using an offcut of plastic. I did this on both sides of the acetate by lying it over the hole in a roll of masking tape.

...and after drying.

Now I have to say, Woodland Scenics Water Effect is amazing stuff! I used the same bottle I used for the river in Leadwood eight years ago and it was still perfect! Also, despite saying on the bottle that it dries in twenty four hours, I hung my sheet of acetate on the washing line in the sun and it was done in an hour. The end result was fantastic!

I had to glue the MSPB into the gate now, rather than after painting, as I want it to be inside the mechanism, with other details on both sides. To ensure I got it right, I cut a card template first as a test fit, then cut the acetate to match.

The gate, with the MSPB cut to size and glued in. Doesn't that look spiffing!

And with that, it was time to start cutting rivets!

I won't bore you with the details, but here are some pretty pictures...

The plinth for the gate: 270 rivets. Note that I removed some cardboard panels to provide a stronger bond when I finally glue the gate down.

The engine: 223 rivets.

The chimney: 278 rivets. Various bits have been added since my last post.


Rivets abound!

The engine again, and the rear of the gate.


After quite a few hours, the Rivet Count for this creation stands at:

1,317 !

And so there you go! I'm ready to start painting! See you soon!

All the Best!