Sunday 23 June 2013

When Is A Dome Not A Dome?

...When it's a Barrel Vault, of course!

Hi, All!

The barrel-vault roof nears completion.

As you may have noticed, I was quite correctly corrected last week by Legatus Hedlius, who pointed out that my engine room's roof is not a dome at all, but a barrel vault...

Components - rivetted and painted.

Anyway, suffice it to say that work on the barrel vault has continued in the last few days, with the painting and fixing of the components I featured in my last post, the addition of must of the roof's structure, a lot of 'glass' and of course, many, many rivets.


The inner structure is glued together.

With the addition of rivets and paint to the various bits I built last week, it was time to glue the whole structure together. This was a very quick and simple matter, and I was soon on to the next part - adding more strips at right angles to the girders.

The finished end and girders form a framework, over which strips are laid to create the roof grid.

The inner structure, prior to adding the acetate 'glass'.

The whole thing grew increasingly sturdy as I worked. Once the long strips had been added, I filled in the gaps between them on the back of the girders, to create an even surface onto which the acetate sheet could be placed (after a swift coat of paint).

Acetate is added to the sloping edges. The external framing is ready to lay over the top.

Here you can see the angle brackets, festooned with rivets. These serve a real funtion, strengthening the roof and holding everything in-line.
The first bits of acetate to go on were the sloping edges, followed by the rest of the roof. In all, the whole structure was done with only four pieces of acetate - the work of a few minutes.

Acetate is laid over the inner structure.
Up to this point, I had been painting all the components as I went, to avoid getting paint on the acetate. However, the only way I can complete the exterior detailing of the roof is to build it up in layers directly on top of the acetate - so I'm going to have a bit of careful (and time-consuming) painting to do.

Strips of plastic are laid over the acetate to create the outer structure. These will have to be carefully painted later.

The outer detailing took shape in the reverse-order of the inner. That is to say, I placed the curved strips first this time, and finished with the long girders. I will have to add a lot of rivets, of course, and I'll be disguising the ends of the roof with a decorative curved gable.

More detailing is added. Rivets will be next...

And so, here's this week's Rivet Count:

So far this week, I have added a further 987 rivets to my previous total of 8,321, meaning that the whole project now stands at:

9,308 !

I'm fast approaching ten-thousand... With several hundred still to add to the roof and yet more detailing to add to the engine room, it won't be long at all...

So that's that for now. More soon!
 
I think this is starting to look sufficiently Victorian...
All the Best!

Sunday 16 June 2013

Putting A Lid On It.

Hi, All.

The dome takes shape.

This week, I have been piecing together the various elements that will form the glass dome over the engine room.

Dome end-pieces are cut to match and detailing begins.

4mm wide strips are laid over 6mm wide strips to create a greater sense of bulk for the outward-facing piece.

As depicted in my last post, the dome is a fairly complex construction. Being largely clear 'glass', it will be necessary to build, detail and paint the inner iron structure, over which will be laid acetate sheet, and then finish with the outer structure.

Rows of window frames are measured and cut for the sloping outer edges of the roof. These will line up with the iron work panels of the engine room walls.

Two identical decorative dome ends support huge girders via decorative corner brackets, all of which are detailed with overlapping iron plates, artistically placed loopholes and many, many rivets. The elaborate design and ostentatious sense of scale are in keeping (I hope) with the designs of great Victorian engineers such as Joseph Paxton. Bigger is better and expense is not a concern...

Outer (top) and Inner (bottom) window frames are constructed, prior to rivetting and painting.

The first step of this part of the project is therefore to complete the inner shell. Both ends of the dome must be finished inside and out, then the girders and the inner pieces of the sloping window frames must be finished, painted and glued in place. Following this, I will be able to glue down the acetate sheets for glass and begin work on the outer detailing.

The various components: girders, dome ends and window frames. At this stage, I haven't constructed the corner brackets for the girders.

Of course, everything has to fit very well indeed, as the roof is largely transparent and mistakes will be obvious.

Fourteen corner brackets are designed and hole-punched for the seven huge girders.

The brackets, detailed, are a great fit - here, they haven't been glued to the dome end at all - just slotted into place.

I require seven massive girders (and therefore fourteen brackets) to attach to the seven radial lines of the dome ends. Of course, if this was a real construction, there would possibly be more iron work -but I don't want to spoil the look of the model, or compromise the transparency of the roof. The engine room should be visible, after all!

Ends and girders, slotted together.

Roof components ready for rivetting!

By constructing all the main pieces in this manner, I now have a 'kit' and can easily see how things are going to work. A massive rivetting session will now follow, before painting the pieces and fixing them in place.

My rivet kit - pointy stick (for picking up and applying rivets) glue, plastic rod, sharp knife. I usualy cut between fifty and a hundred rivets at a time...

...and so begins the rivetting...

A girder is detailed. At 51 rivets per side, and a total of seven girders, these alone will account for 714 rivets!

Outer (top) and Inner (bottom) dome ends are detailed. Together, these account for 639 rivets. These pieces can now be painted before sandwiching a sheet of acetate.

Which brings me to this week's Rivet Count...

So far, haing applied rivets to the new dome end and one half of a girder, I have added 690 to last week's 7,631, bringing the total so far to:

8,321 !

What is more, each girder will have 102 rivets, so by my next post, I shall pass 9,000. This project is starting to get silly...

I still have a lot more detail to add to the engine room, but I am starting to think about the mid-section of Lord Smdgington Smythely-Smythe's Hydraulically-Motorvated Sextupedal Land-traversing Vacational Domicile...  the Mansion!

So now, on to a bit of smaller-scale silliness.

I unearthed these two conversions the other day. Some time ago, I had been working on an army of Rackham Miniatures' wonderful Japanese-style goblins. (What a shame those things aren't produced anymore!)

Goblin heads and reptile hands and swords (from Reaper Miniatures' Reptus warriors) are added to a wire frame before sculpting ethereal bodies from greenstuff.

The goblin samuraii and ninjas are all packed away in a box somewhere, but having had two heads left over, I had sculpted these two to serve as Gaki (Japanese ghosts)... Anyway, in keeping with Steampunk and Lost Continents and all that stuff, I decided to resurrect them (sorry!) as a pair of Genies.

Ptonik is undercoated with white, then washed with brown ink. Following this, he is highlighted white and washed with thin blue ink.

And so, may I present the legendary scourges of the lost city of Ah-Pul Sch'Napps - Djinn and Ptonik!

Highlighted again with a pale flesh colour.

Shading added with more blue ink. Hair is coloured with a coat of rust ink.

These have been quickly coloured with inks - as with most of my miniatures.

Ptonik: weapons are detailed with metallic paints. Mouth and eyes are blocked out with red ink before picking out teeth and eyeballs with white paint, then yellow ink, then white again. Fingernails washed with yellow ink and highlighted white.

Djinn. What a pretty boy!

I'd like to come up with a witch doctor for the Wutha-F'Kahwi tribe to summon these terrors. I have a few things in mind.

A somewhat startled adventurer may soon wish he'd stayed in bed today...

These didn't take long to do but I think they look great!

Now, on with the rivetting... More soon!

All the Best!

Sunday 9 June 2013

Back On Course

Hi, All!

Two gentlemen travellers enjoy the night air outside the engine room.

After a brief spaceship-producing interlude, I returned this weekend to my work on Lord Smudgington Smythely-Smythe's Hydraulically-Motorvated Sextupedal Land-Traversing Vacational Domicile...

Super-thick bronze-wound guitar string... Awesome!

As you will recall, I had begun work on the massive dome roof for the engine room, and work on the engine room interior was progressing apace. This weekend I decided to add a few details, provide the decks outside with floorboards, and a few other bits and bobs...

Guitar string conduits are bent into shape, plastic tubing is added and supports are made.

As is my custom, I had a birthday this year. My son, being the astute and caring young chap that he is, saw fit to give me a set of bronze-wound acoustic bass guitar strings - and I don't even own an acoustic bass guitar! These blighters are chunky in the extreme, and I decided to add a few bits of them to the engine room details.

But first: The Dome.

Top left: finished outer layer and freshly-cut inner layer. Bottom left: iron 'T' girders are created to add strength to the model. Right: rivets are added, the inner layer is painted and the two layers are joined.

I had already completed the outside layer of one end of the dome. Now it was time to cut, detail and rivet the inside layer. This adds strength and rigidity to the roof, as well as a lot of depth and detail. I will, of course, have to duplicate all of this work for the other end of the roof before completing the structure, but given that I have to use various hole punches eighty-eight times per layer, I opted not to do it all in one sitting...

The inner layer differs from the outer, in that I formed radial 'T' girders to strengthen the shape. These will give me something to attach more iron work to as I extend the dome back to cover the engine. Rivets were now added and the the inner layer was painted before joining it to the outer. (Is this sounding complicated? I assure you, it will all make sense soon!)

Satisfied that the dome was taking shape (watch this space, folks!) I turned my attention to a few machine details.

Guitar-string conduits completed and in place...

I have always intended to extend gantries and walkways around the engine, given that the boiler is two stories high. I decided, therefore, to add a few gauges, levers and so on at the higher level, which will then be approachable from the walkways.

Left: one of the previously unused terminals on the engine now feeds into a pole. Right: a gauge and big, hefty switch are modelled from plastic.

So began a bit of super-fiddly-jiggery-pokery.

The finished pole.

Another pole and a giant resistor are added to the other side of the boiler.

Twisty things , switchy things and spinny things. Who could ask for more?

Various terminals on the engine had been left unused as yet, including four big fat ones on the furnace. It was time to use these...

Top: Guitar string is bent into shape. Bottom: sockets and a cradle are modelled , painted and glued into place.

Guitar string snakes across the deck and down into the pit.


With the engine room details looking cool, I thought I should also take a look at the coal hatch and the deck planking outside the engine room. This was a simple matter of adding some thick card strips down the length of the deck, a great many rivets, and some balsa sheet which had been scored and stained as boards.

Thick card outlines the edge of the deck.

Top: rivets are added, as well as dividers to support a handrail later. Bottom: The edging is painted and balsa sheet is glued into the gap.

The coal hatch was made from a rectangle of plastic sheet, scored to look like hatches, outlined with stips of plastic, a few rivets added, and some simple handles made from rod. The hatch and the edges of the deck were painted the same dirty pale grey as the outside of the vehicle.

Top: a simple design is drawn onto plastic, prior to scoring, detailing and painting. Bottom: The finished hatch.

The hatch by lamp light.

So I suppose that brings me to this week's Rivet Count...

All these bits and bobs have added a further 576 rivets to my previous total of 7,055, making a total so far of:

7,631 !

Will it never end?

Albert Finch treads the new boards.

The hulking mass of the engine is just visible through the cloudy glass...

Anyway, there you go - plenty still to do before this monstrosity is finished!

The increasingly complex engine in all its glory.

All the Best!


Sunday 2 June 2013

In Space, No One Can Count Your Rivets.

Hi, All!

Bud Weiser and Stella Artois ponder the mystery of the Puzzle of the Ancients...

This week I took a brief break from the immensity that is my huge walker project to play with some bits of rubbish.

Rubik's Cube, bead and bits of foam. A simple pallette.

I'd had a couple of silly ideas floating around my head for a while, and I decided to see just how quickly - and with how little effort - one could throw together a cool model. I set myself the challenge of using as little cutting and measuring as possible, by adopting what I like to think of as the 'playschool' technique... I'm sure you all fondly remember those happy days where you would glue toilet roll tubes, lollypop sticks and cotton bobbins to your fingers and proudly proclaim, "Look Mummy! It's a ephelant!"

Well, I remember, anyway...

A bead is attached to the cube, a little greenstuff creates a 'cuff' and a pin is inserted to anchor it to its plinth.

Steps and plinth are sketched on green foam, roughly carved out and detailed with a pencil. A small slab is added to the top to mount the cube.

I had the idea for the Puzzle of the Ancients at exactly the same instant that I threw my miniature Rubik's Cube across my office, shouting, "It's impossible! The damned thing must be broken!" Or words to that effect

The cube assembly is glued in place. the cube has been 'fixed' with superglue so that it doesn't turn and crack its paint.

The paint starts to go on.

Once this piece was built, the whole thing was painted as sandstone, then colours inked onto the cube's faces, which were further drybrushed as stone again, to make them look faded.

Deep in the wilderness, the Puzzle of the Ancients has confounded the finest minds for centuries...

Not bad. It's a very simple model, and took about half an hour to build and less than an hour to paint. But I think it works.

And so... On to the big one...

Junk: contact lens cases, old vinyl record, twink dispenser, beads, deodorant, sewing machine parts, miniature candlestick, reflector (wasn't used in the end.)

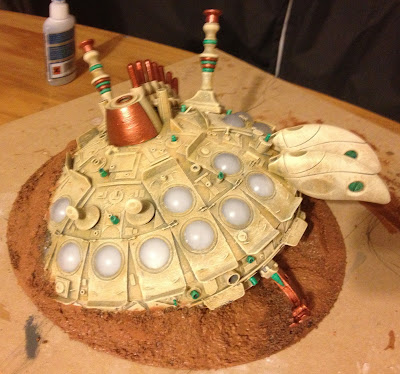
I've had a couple of old diffusers lying around for ages, and always intended to make some sort of flying saucer from them. So I grabbed a whole pile of bits and some really awesome glue and started sticking stuff together..

Top left: light diffusers. Top right: a diffuser is cut and glued. Bottom left: the 'hull' of the ship. Bottom right: a central lie is drawn across the diameter and masking tape is used as a guidelie to get the 'chimneys' straight (miniature candlesticks)

This was great fun. No cutting, no measuring, just sticking stuff down and watching the thing grow.

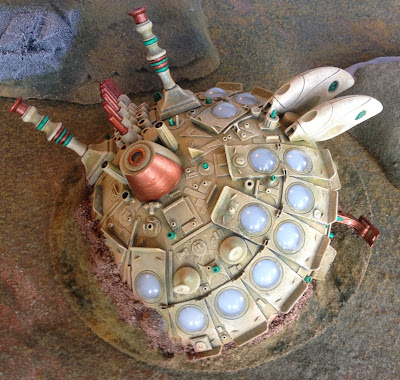
Left: twink dispensers form a wing, while the lid of a deodorant stick forms the bridge. Right: contact lens cases become windows.

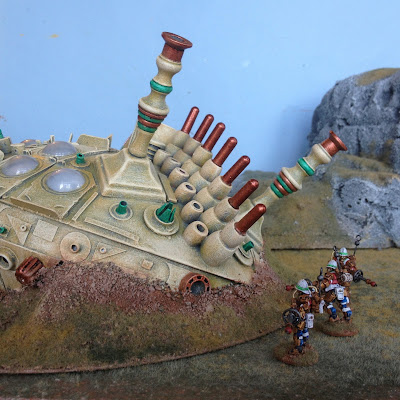
Beads, superglue lids, plastic stoppers and the insides of pens (butchered for lanterns in the walker project) form a strange spine-like array. Two plastic cufflinks become sensors.

I also decided that there should be NO RIVETS AT ALL! After all, it wouldn't do for a crashed alien spacecraft to look like it could have been built by British engineers...

A sewing machine foot becomes a landing gear. Random offcuts and bits of junk are glued all over the model.

A veritable plethora of rubbish!

When the main structure was built, I set about sticking offcuts of plastic and card, bits of tube, beads and anything I could find in my bits box onto the hull. The trick here was to glue bits on top of bits on top of bits, to form complicated, odd and random shapes that didn't just look flat and uninteresting.

The model is painted dark grey, then highlighted with light grey.

This done, I sat back, looked at the clock, and was amazed to see that I had constructed the whole model in two hours!

Tones of orange and yellow are drybrushed over the grey. The windows can be scraped clean after, leaving really cool milky white domes that conrast beautifully with the paint.

Now it was time to add paint. I wanted something bright and colourful, but also solid looking. I decided to work from a dark grey undercoat and build up the colour with multiple heavy coats of drybrushed colours - this would be fast and easy, and require little drying time.

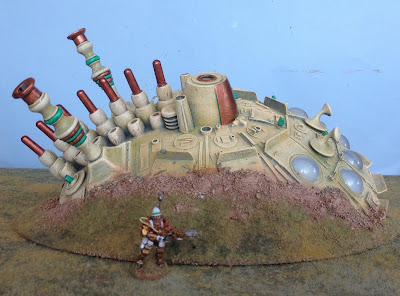
The finished colour scheme: A simple yellow-ish body with touched of green and copper.

Green ink was added to a few sticky-out bits, and copper paint added a nice contrast.

The ground is built up with green foam and DAS clay.

Grit is added to the whole base, then painted brown.

Now it was time to stick the ship to its record (opera! ugh!) and build up the ground of the 'crash site' around it. I used chunks of green foam, filled the gaps with DAS clay and coated the whole lot with grit. A quick coat of brown paint followed, which was then highlighted, and finally static grass was added.

The finished ship.

Hey, presto! A quick, easy and kind of cool spaceship!

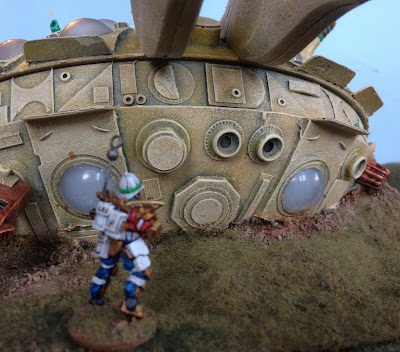
British troops search for a way in...

I'd like to make this the objective of a game - British and Prussian troops race to seize the alien technology for the glory of their empires... or some such.

"A hatch, sir!"

The rear view.

Anyway, there you go. Now it's time to get back to work on Lord Smudgington Smythely-Smythe's Hydraulically Motorvated Sextupedal Land-Traversing Vacational Domicile.

The Sergeant poses for a lithograph...

All the Best!