Saturday 27 April 2013

The Walls Are Closing In...

Hi, All!

The rear of Lord Smudginton Smythely-Smythe's Hydraulically Motorvated Sextupedal Land-Traversing Vacational Domicile... with many rivets.

It's been absolutely ages since my last post, but I can assure you I have been busy! When last I spoke at you, I had completed only one of the upper walls of the engine room. There remained much to be done.

The front wall - A cavity is closed in with a panel and lantern, to shine down on the furnace.

Well, since then, technical hitches and unseen interruptions have abounded - but I have prevailed! All four walls are now in place and I'm ready to begin construction of the dome.

Problems arise... A broken wire necessitates surgery before the port wall can be attached.

The first technical hitch I technically hitched upon was a simple matter of my own rather amateur soldering getting the better of me. I was putting the finished port wall in place when a wire from one of the lanterns came out. "Hmmm..." I quite correctly observed, "That is a tad annoying, to say the least." There followed some wall-surgery of a slightly destructive nature and eventually I won...

But so did the swear box.

Why is that lantern not working?! The whole lantern has to be rebuilt and put back. But the result is worth it.

The second of the aforementioned technical hitches occurred when the front wall was painted, finished and glued into place... "Why, pray tell," sayeth I, "is that there lantern thingy not all sparkly-like?" There followed some more harsh words. It was then necessary to disconnect the soldered wiring, cut off the lantern, cut it to pieces, rebuild it, put it back, and repaint the join... Fun, n'est-ce pas?

Three walls in place...

Looking forwards from the engine.

Anyway, with those two walls in place at last, I was able to turn my attention to the rear of the vessel. I had been unsure of how I wanted this to look, but it quickly took shape.

Ribs are cut and positioned to determine the shape of the hull.

The rear hull is designed, detailing begins, and everything is checked for a nice fit.

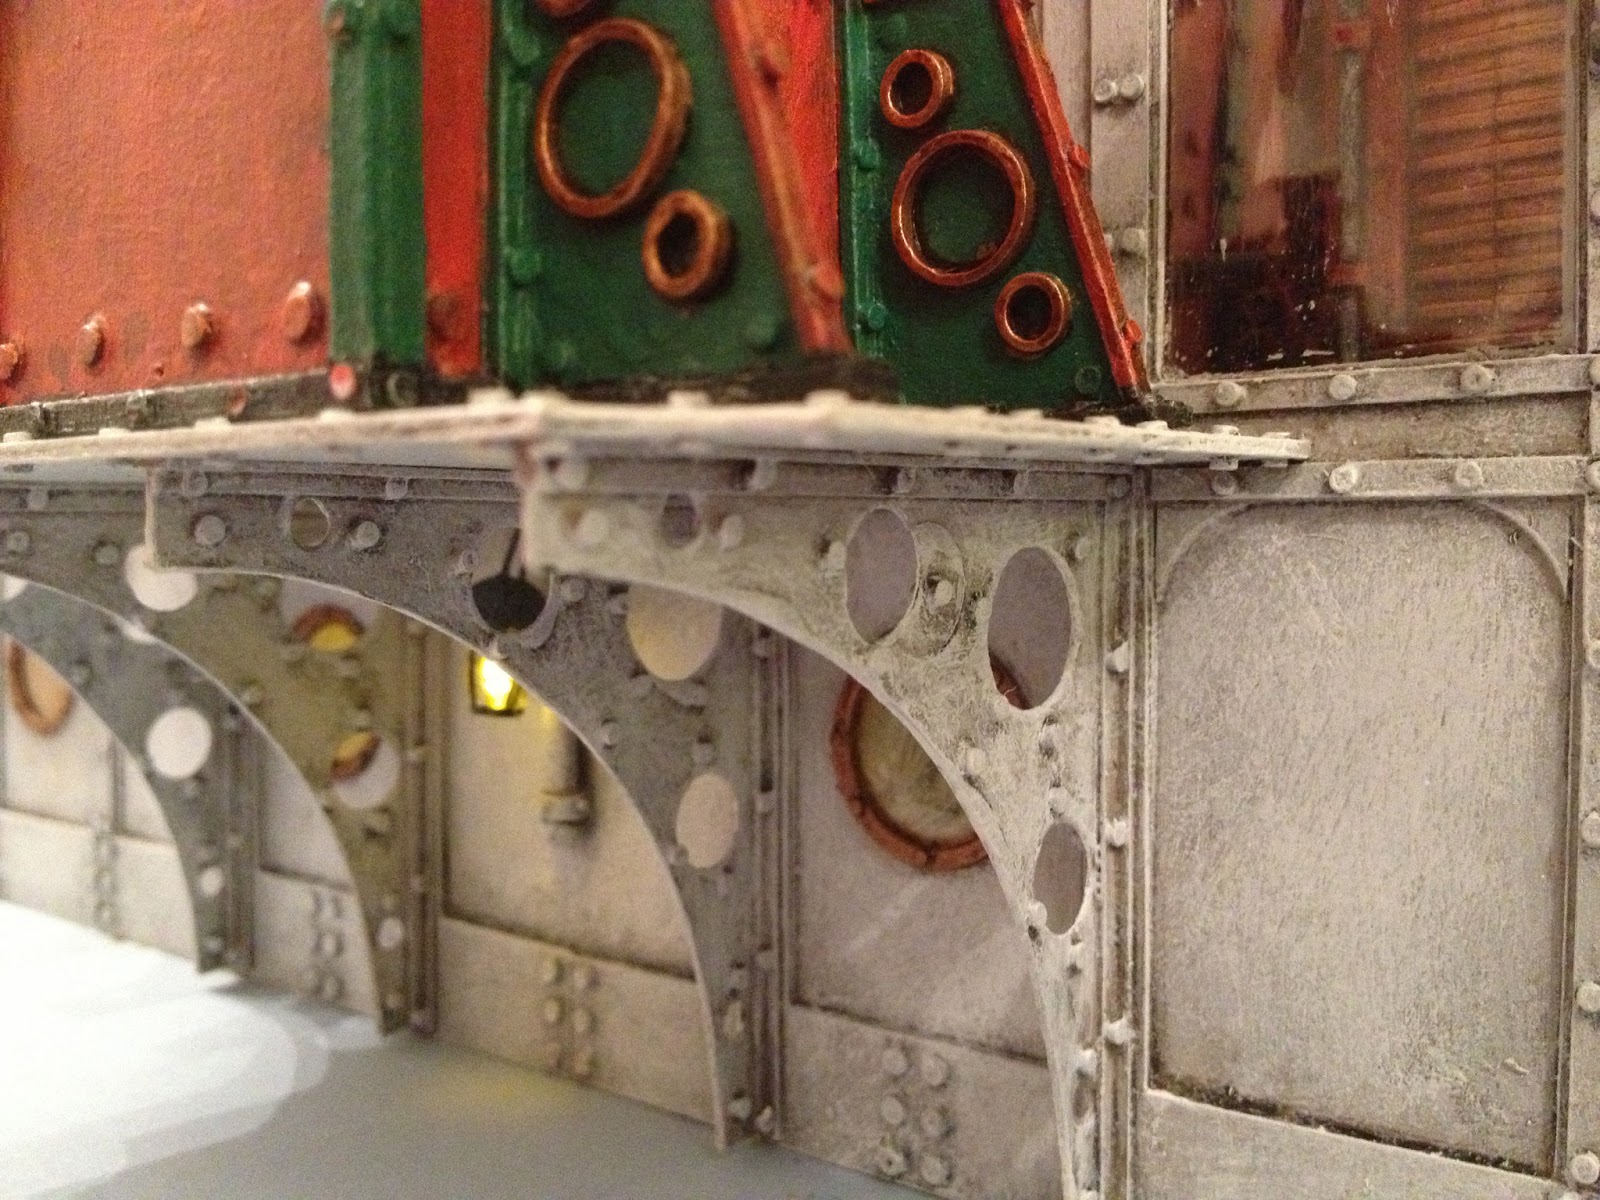
First, I needed to plan the shape of the hull by outlining the decks and attaching 'ribs' to the engine-room section. This gave me the shape of the rear hull. I determined that I wanted balconies overhanging the rear, and that the chimney-stack - protruding through the wall - should be supported with ornate Victorian-style girders.

Girders are constructed to support the chimney stack and balconies.

A platform is attached to support the chimney stack. Rivets begin to sprout from many places...

Portholes were added to the lowest deck. This will continue for the full length of the vessel, and every porthole will have a light behind it. This produces a few challenges of its own: If the portholes are too clear, wiring and plain board will be visible inside the vehicle. Plus, as light is actually invisible until it hits a surface, the LEDs would be doing very little unless I wanted them to be seen directly - the answer: dirty glass. I frosted the inside of the glass with watered-down white paint. This catches the light of the LEDs and looks great.

Lanterns are added by the doors and under the chimney stack. LEDs are positioned behind the portholes (under the internal deck)

More lanterns were also added to the rear bulkhead - one over each balcony and one beneath the chimney stack. In designing these, the LED wires actually passed straight through into the wall cavity. Plastic rod and beads were glued to the wall underneath to give the appearance of being part of the lantern - but in fact are not.

RIVETS! Thousands of 'em!

Now began the rivetting...

This was my biggest rivet-fest session yet. And just to show you all where they go, I have broken down this week's Rivet Count...

Front and Side Walls (since last post): 770
Large girders: 192
Small girders: 156
Back wall 1.6mm 'normal' rivets (exterior): 421
Platform: 58
2mm 'fat' rivets: 122
1mm 'small' rivets: 60
Back wall (interior): 332

Total added: 2,111
Bringing the total for the walker so far to: 6,670 !

That's quite a lot.


Many rivets, painted. The portholes have been dirtied, to catch the light of the now-concealed LEDs.

With the rivets done, the painting seemed simple. And indeed it was. I think this vehicle is going to look fussy enough without adding a complicated colour-scheme, so I'm keeping things very monotone. And don't you think the red engine looks splendid against the blue-grey of the hull?

Under the engine...

Girders await boards and handrails to complete the balconies. And the door needs a handle.

All that remained was to wait for nightfall and turn on the lights...

All lights present and correct...

Financier and a slovenly workman discuss... what, exactly?


So there you go! A massive rivet-input and a good result. I hope to start on the dome soon, although things may be a little slow for a week or two, as I'm moving house...

So long, Kapiti Coast... Hello Wellington!

Lanterns lend the decks an eery glow...

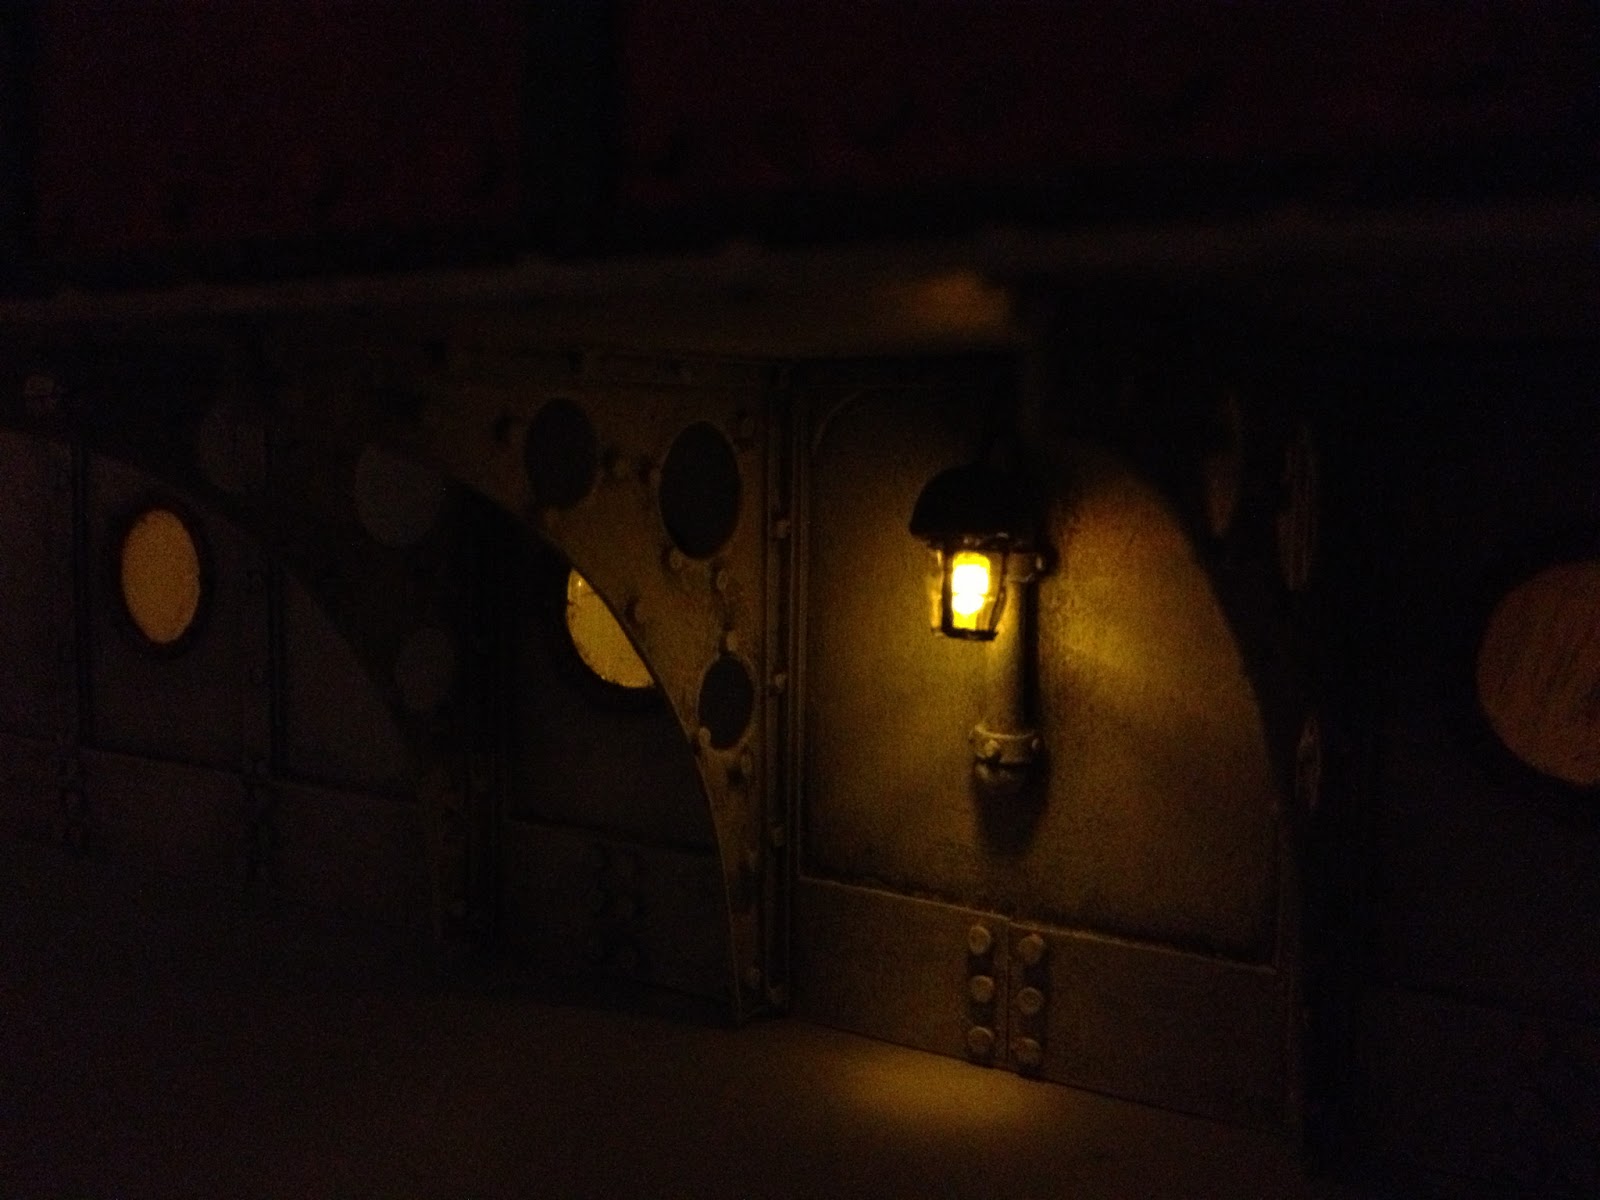
The aft-lantern and portholes.

More soon.

All the Best!


Monday 1 April 2013

Givin' It More Gas!

Hi, All!

Night time on board the walker.

I hope you've all had a great Easter weekend with plenty of unhealthy things.

I decided to dedicate my time off work to making some good progress on the engine room. And so I did. Unfortunately, the work I embarked upon was so detailed and fiddly that when all is said and done, it doesn't really look like much at all...

The walls are cut out twice to give inner- and outer-pieces.

One of the problems I knew I would have to deal with sooner or later was how to hide the wiring for my LED lanterns when putting the lanterns on walls which could be seen from both sides. Thus far, the core room and the engine room had been easy, as I wasn't showing what was beyond the walls... But now I was faced with the upper level of the engine room - outside which is the main deck.

Lanterns on the interior starboard wall.


The answer was obvious - but presented challenges. The wiring has to be hidden inside the walls. The difficulty here is that even an extra milimeter's thickness represents 60mm of iron in real life. I would have to keep the cavity within the walls to an absolute minimum depth.

The reverse of the interior starboard wall, before being closed in. In this case, I experimented with guitar string - but it proved very difficult to solder so I chose to strip copper wire from its insulation instead.

I elected to construct the walls from 0.5mm plastic board in three layers - inner and outer walls and a largely hollow layer as a cavity. (This would also enable me to lay the acetate sheeting for porthole glass within the walls, rather than trying to stick circles inside the portholes afterwards).

The finished interior starboard wall. Now to finish the exterior...
So began a complicated process. Each wall had to be cut twice, making sure portholes and doors lined up perfectly. Lanterns had to be constructed, pushed through the wall, soldered to stripped copped wire (insulation made it too thick) and then the walls had to be closed up...

All this and rivets too!

Soon-to-be lamp-posts are wired.

I didn't want the lanterns outside on the deck to look the same as those inside, so I designed a 'lamp-post' look. Here, I was able to run one insulated wire inside the post and a thinner bare wire behind the post, in a slot I created on the surface of the wall.

Lamp-post takes shape.

This is obviously easier than hiding wires inside walls, and it looks nice and bulky too. I added a little round bead to each lamp-post to finish the top of the tube nicely, and painted the posts in with the rest of the wall.

Outer port (above) and starboard (below) walls. A dirty wash of black and rust ink has been liberally applied to the starboard wall. I will highlight over this fairly heavily.

Speaking of painting, it has been suggested by some followers of this project that the machine doesn't look dirty enough - and I agree. I started out wanting a clean and shiny look, but for realism, dirty would have been better. Sadly, I have decided not to try 'weathering' the interior of the engine room - the likelyhood of ruining the paint job and/or damaging the model is just too great. BUT... I have decided to make sure the exterior looks nice and gritty.

Pens are butchered... Don't worry. I've kept all the useful bits.

The finished coach-lantern.

Once the painting was done, I finished off the lamp-posts by cutting the ends off some pens and gluing them over the LED to create a coach-light effect. I think they look sufficiently different to the interior lights.

The starboard wall, in place.

The starboard wall from inside - wired and working!

Now the first finished wall was glued into place, having made holes for all the wires, and it was back to the soldering iron... sigh...

I suppose I should give you all this week's Rivet Count...

Having finished the starboard wall inside and out, and half of the port wall, I have added a total of 636 rivets since last week, bringing the total so far to:

4,559 !

Not bad...

Anyway, suffice it to say that I got bored of rivets at around about 600, and turned my attention to the front wall of the engine room.

The front wall is started.

I wanted this to be a little different to the other walls,  and to fit in with the huge glass dome I will shortly be constructing over the engine room. I also wanted to to leave plenty of glass through which the engine may be viewed.

Rectangles quickly become arches.

In Victorian manner, I deemed that the big windows should be arched. I have lots of curvy off-cuts from stamping out porthole frames which were perfect for filling in square corners to create arches...

The exterior front wall, waiting for rivets and lamp-posts

This wall will also have lamp-posts and an interior lantern, so it was constructed in layers, also incorporating two large pieces of clear acetate as glass. By building the wall up from differing strips of plastic, I was able to create a dynamic and interesting design with very little hard work. All that remain to be added are a few hundred rivets...

The front wall, unfinished, propped in place.

The engine room.

So there you go! The starboard wall is done, the port wall just requires a couple of hundred rivets and some paint and the front wall is nearing completion. Now I'll have to decide what to do at the back of the vehicle!

By lamplight, the front wall looks almost done...

Albert Finch, of the Bank of London, scrutinises his investment.

More soon!

The engine room by gaslight.

All the Best!