Monday, 18 July 2011

HMSW Gargantua - Progress so far...

Hi, All!


Forgive me, Wargamers, for I have sinned: It's been two weeks since my last post!
Things have been a bit busy for me the last few days - mainly with a very tiring work schedule and a couple of pretty heavy nights out - so model-making has been a bit slow. Nevertheless, I am pleased to announce that my work on the HMSW Gargantua is back on track.

Here's the latest:
Left: the sculpted front-end and the flywheel, in place at last beneath the rear deck. Right: Rear view of the engine and hull.

By far the slowest part of the project so far has been the front-end of the body. Because of the need to anchor the neck pistons way back inside the body before adding the outer armour, I had to sculpt much of the front from green stuff, rather than just modelling it from board. This was tedious work and really made it hard to feel enthusiastic!

Left top and bottom: close-ups of the deck and fo'c'sle. Coal will eventually be heaped in the open compartment. Right: The rear deck takes shape above the wheel.

My aim this week has been to get the flywheel permanently in place - which required that a great many interior details be finished, painted and glued in first. It seemed that everything I did created a new issue to be resolved before the wheel could be put in. I ran out of materials, too - which didn't help!

Close-ups of the head. A swing-bridge will join the body to the head eventually. Looking through the mouth, you can see through the head to the steps which lead up to the main deck.

The head is still not glued on (it slots onto two of the pistons) and neither is the engine. There's a lot still to do before that happens. And as for the legs... Still being designed! I need to see the final bulk of the body before I can be sure the legs I am planning will look right. But I am confident that things will progess quickly now - most of the really fiddly stuff is out of the way.

Of course, I still have to make ladders, etched window glass, a storage hatch, navigational controls, tannoy system, a lot of armour plating, hand rails, swing bridge, cables, gatling gun, cannons and gun-ports, flags...

Smaller than I originally thought it would be... Only 30cm long.

Oh, yes: nearly forgot...

RIVET COUNT: 1,398!

In other news:
I have confirmed that I will be taking Leadwood to A Call to Arms this year, August 20th-21st, in Wellington. Notorious Greg, Myself and others will be running demo-games of The Rules With No Name through the duration of the convention. It would be great to meet any and all who are interested!

All The Best!

Monday, 4 July 2011

Working With Inks

Hi, All.
There's a new Croc in town!

I thought as a bit of a change, I'd do a quick post on my inking techniques. I tend to work mainly with ink washes, rather than paints - and although they are a little harder to get the hang of (mistakes are not so easy to correct sometimes) the results can be very nice...

Anyway, while work continues on the HMSW Gargantua, (rivet count: 1103!) I have also been making a few changes to my Croc army for Hordes of the Things. One change in particular is the replacement of my Lizard Wizard with a new Croc Shaman from Privateer Press. I thought I might as well document the process... Hope it's of interest!

1: bare metal. 2: white undercoat. 3: brown wash. 4: highlight.
The key to the whole inking process is the undercoating technique. I start with a couple of washes of thinned-down white acrylic. Next, the whole model is washed with brown ink. I use a colour called 'Earth Brown' from Magic Color. This is a fast-drying, semi-tansparent, colour-fast ink. (You need to be careful when selecting inks - fading over time can be a problem, so be sure they are colour-fast. Yellows are particularly susceptible.) Following the brown wash, the whole model is dry-brushed with a pale colour. I favour 'Just Right' from Resene.

Note that I am using shades of brown, rather than black, white, grey, etc - the end result is warmer, with nicer blending and less starkly-contrasting shades.

Undercoat and a single wash of colour so far - and most of the shading is done already!
The next step is the flesh colour. A single thin wash of golden-brown and green ink is applied to all areas of flesh. By watering this down a little, the shading achieved with the 3-stage undercoat shows through. At this stage, the flesh could almost be considered finished.

Top left: the whole model is highlighted with off-white. Top right: soft flesh parts, underbelly and tail are highlighted with white. Bottom: all green areas are washed with yellow. 
Next, the flesh is highlighted. All areas are drybrushed again with 'Just Right', then the underbelly and other soft-flesh areas are gradually highlighted up to white. Finally, all areas of flesh intended to be green are washed with watered-down yellow ink. This really brings out the colour and warms up the whole model.

Details are added. Large areas of colour are ink-washed, then highlights picked out with paint.
Once the flesh is done, the mouth is washed with red ink. Teeth can then be picked out in white. For all of my crocs, I have added a yellow stain to the teeth as well.
Other details follow much the same procedure as the flesh. All the shading is already in place, so the head-dress just requires alternate washes of red and blue ink. The leaves of the shaman's skirt are just a darker green than his skin.
The staff and wooden mask are washed with walnut woodstain, then dry-brushed with a sandy brown. The bones and croc-skull on the staff and the various other bony adornments are highlighted up to white. Details are picked out in gold and a few runes painted onto the skull with neat red ink. Ropes, straps, etc. are picked out with neat brown ink.

Wonder if the little helper likes his new boss any better than the old one?

Finally, a few scales are picked out with watered-down black ink and the model is given a coat of Testors 'Dullcote' varnish.

That's about all there is to say! It's a very simple way of achieving nice results. My whole Croc army and most of the occupants of Leadwood were coloured using this process. If anyone has any questions, please feel free - ask away!

Well, I suppose I should get back to my other projects now -
  • HMSW Gargantua
  • Modular multi-scale wargames table
  • VSF British Army
  • Sci-Fi Tank
  • Japanese Goblins
  • 10mm Fantasy
Perhaps I should quit my day job...?

All the Best!

Monday, 27 June 2011

A Rivetting Experience!

Hi, All.

...and the rivet-count keeps climbing...
Ever had one of those projects that just seems to go on and on, taking up your time, materials and patience, while never seeming to progress? Well, guess what...?

It's been over a week since my last post and things are progressing on the HMSW Gargantua project very, very S L O W L Y...

Don't get me wrong. I'm happy with the results so far, but I have rarely undertaken a project that required so much forward planning. This week's efforts have been concentrated on the head of the beast - a part which I had previously thought I might leave until much later. Meanwhile, the legs remain on the drawing board - I won't know exactly how I want them to look until the boday and head are complete...

Internal bulkheads, doors, ladder and trapdoor had to be completed early.

The internal elements of the head had to be designed, built, painted and glued in place before the head itself could be constructed. Details such as navigational equipment will be added much later, but structural elements such as trapdoors, doors and ladders had to be finished first. This took a lot of designing, building and rebuilding. Much time was spent just staring at little bits of plastic and forcing myself to keep going...

The rear of the head, as seen from the body, with a view through to the 'mouth'...

I won't continue to ramble on about how long this is all taking, but if you've ever inflicted this kind of thing on yourself, well - you understand...
 
Four mighty pistons link the head to the body. Steps from the main deck will eventually link to the rear door of the head via a swing-bridge...

The pistons which link the body to the head are firmly anchored far back inside the body, so that they can take a lot of weight. A lot of strength is essential - there may be the added weight of three or four miniatures inside the head, not to mention getting the occasional knock, and damage may be impossible to repair once the body is closed in. For this reason, I have taken my time and made sure things are well supported inside. As with any project, it is not worth taking short-cuts during the initial stages. Everything else could fall apart if the foundations are weak...

So there you have it for now. I suppose the Victorians didn't work very fast when they were building steam-powered monsters, either.
Rivet-count so far: 865! And I haven't even detailed the outside of the head yet, let alone the body or legs! 

In other news:

Cute, isn't he.
 Mid-week, I received a welcome distraction from plastic rivets and the smell of poly-cement. A package arrived from The War Store with some new crocs to add to my HOTT lizard army. As a means of keeping myself sane, I have decided to do just one at a time, in between working on the walker.

First up: the Blackhide Wrastler from Hordes Mercenaries/Privateer Press. This dude is BIG! And so cool...
Too cool, in fact. He'd be wasted if I just kept him for HOTT - let's face it. I mean, wouldn't he just be perfect as the creation of a mad Victorian scientist? I've decided to base him on a small  (only 50mm square!) base, then insert that into a larger base for HOTT. More bang for my buck! Let's see what those intrepid explorers make of this wee beastie!


Anyway, hope you like the paint-job.

More soon - I'm going back to my rivets and a nice glass of pinot noir!

All the Best!

Sunday, 19 June 2011

Full Steam Ahead!

Hi, All.

I never, ever want to do this again!
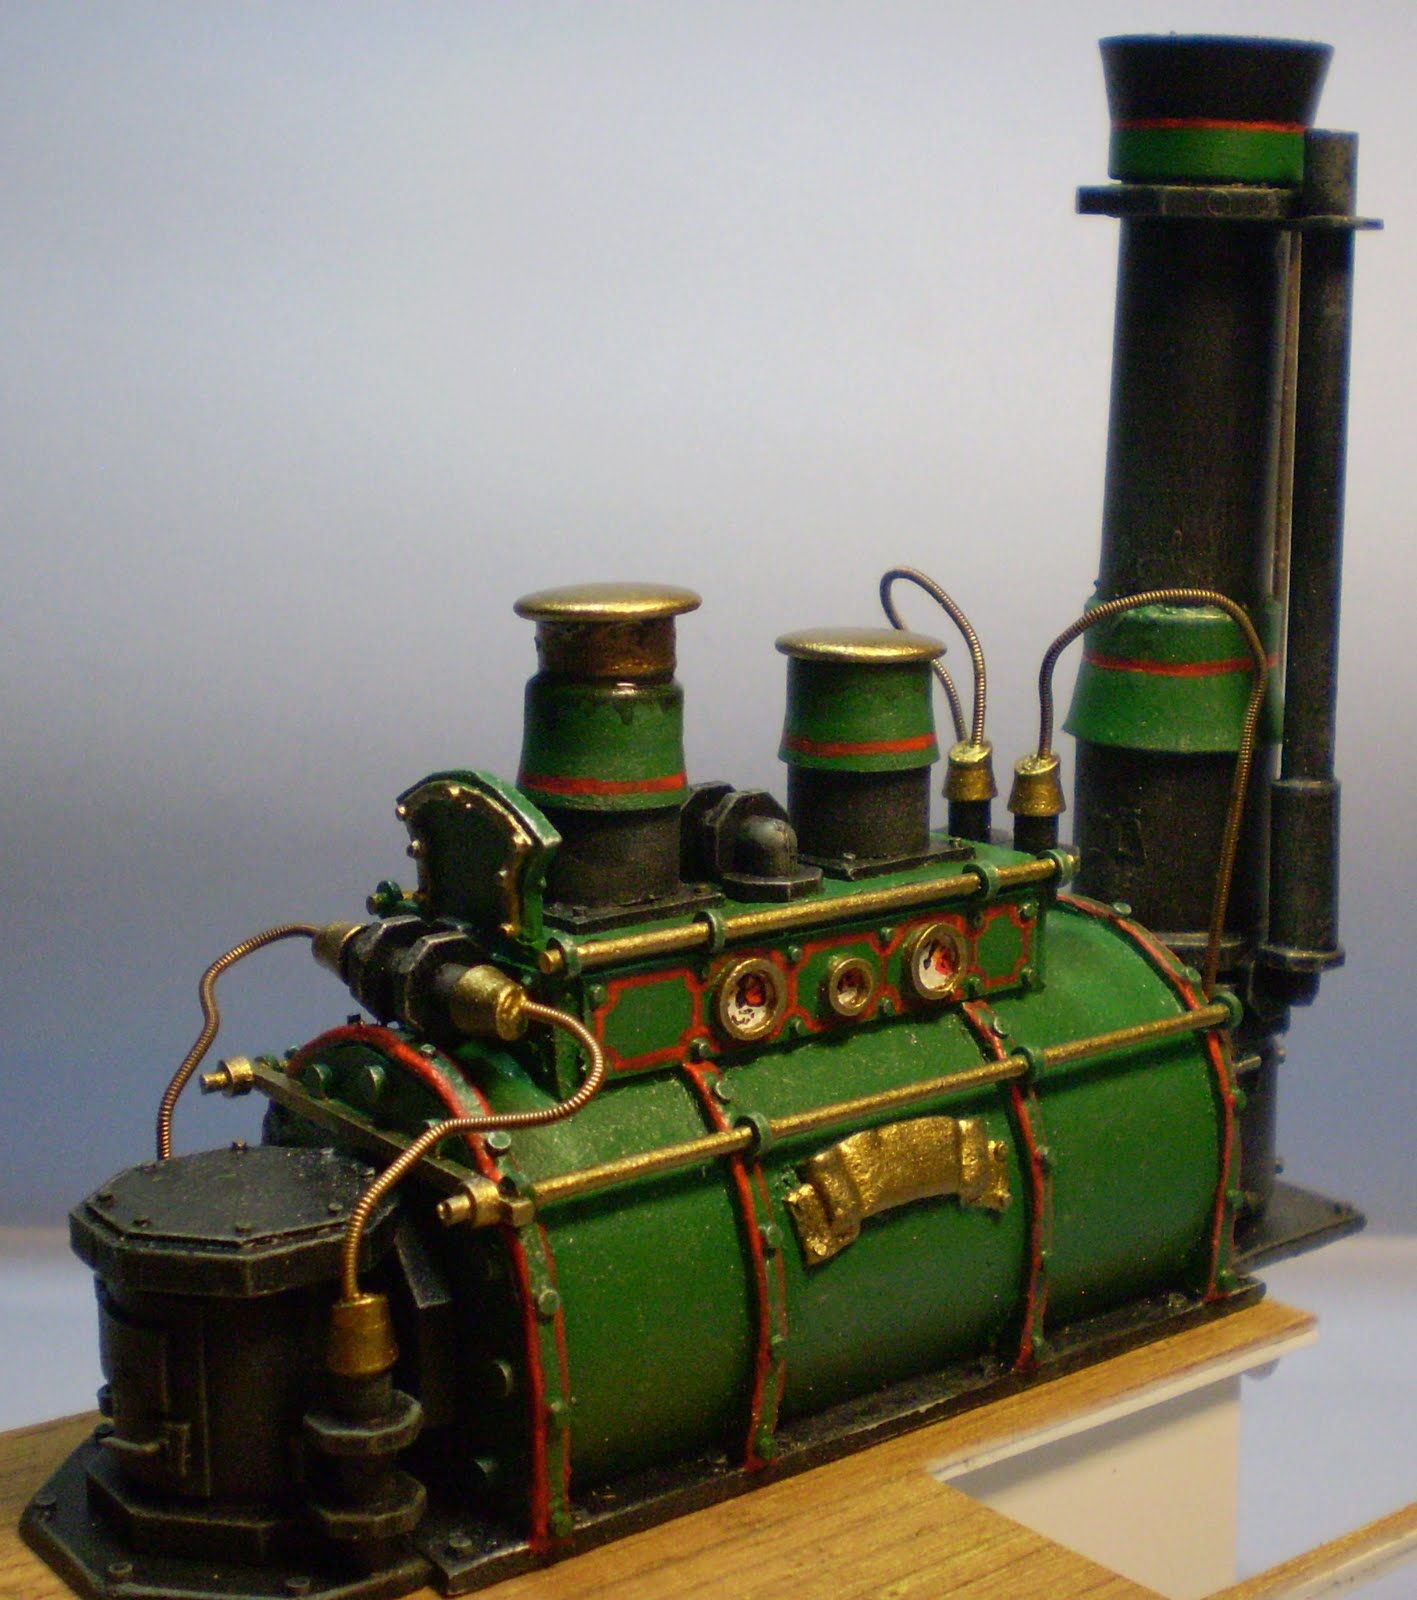
As you can see from the above picture, the engine for HMSW Gargantua is now complete!

It has taken me many hours of work today (about twelve, I think - I lost track!) to complete the detailing and painting, but I think it's worth it...

Front and rear shots, without the flywheel.

Close-ups of the furnace and boiler. Intimidating, huh?

The design hasn't changed much since I posted my first pictures. the biggest changes have been to make the smoke-stack slightly shorter and bulkier, and the addition of a much more impressive furnace.

Calligraphy not being my strong-suit, I haven't summoned the courage to do this bit yet...

The boiler now has a brass scrollwork-plate, onto which I plan to inscribe the name of the greatest industrial city of the Victorian Era... A place very close to my heart. After all, Sheffield made 90% of the world's steel at this time... But hand-painting "Sheffield" might be a bit much - we'll have to see. If I can't do it justice, I'll have to come up with something else.

Engine and flywheel, together at last!

Lieutenant Boddington tries to keep his excitement firmly in check behind his stiff upper lip.

I decided to change the plans from the original long-and-sleek 'battleship' configuration to something a bit more bulky and brutish. So, the flywheel will now be mounted next to the engine, rather than behind it. This will reduce the length of the model considerably, but she'll still be huge!

Big, isn't it?

So far, so good. Now, for those of you who are wondering, there are One-Hundred and Thirty-Four rivets on the engine assembly, all cut and glued by hand. Combined with the flywheel, that makes Four-Hundred and Seventy so far!

Anyway, I can't stay here, blogging away! I've got LEGS to build!

More soon.

All the best!

Friday, 17 June 2011

Free Wheelin'!

Hi, All.

In today's update, I am pleased to announce some progress! After a week of planning, cutting, scrapping, heavy drinking and a fair bit of colourful language, the final incarnation of the flywheel for HMSW Gargantua is complete!

Lieutenant Boddington nurses a sore shoulder after attempting to roll the gargantuan thing unaided. But no one's laughing now...

This wheel is slightly smaller than originally intended (80mm diameter instead of 100mm) but I'm very happy with the results.


The outer rim is a roll of masking tape, peeled back to the desired thickness. (Don't worry - I kept the tape for re-use, wrapped around a plastic hair-gel pot.). The inner hubs are press-studs for denim jeans. Everything else is plastic board and rod.


Needless to say, the rivets took quite a while - each was cut from a plastic rod and glued in place by hand. There are 144 x 1.6mm rivets and 192 x 1mm rivets - a total of 336! And this is just the flywheel...

Anyway, that's all you get for now. I've got a couple of days off soon - I plan to finish the engine and start on the legs.

Watch this space!

All the best!