Monday, 8 October 2012

Those Magnificent Men...

Hi, All!

Mk I Hydrothermicopter... Airborne at last!

Well, here we go again - another day, another post...

The crew, having been disarmed...

I am happy to announce that the first Hydrothermicopter is finished! As predicted, the cockpit detailing and crew were a little fiddly, but I'm happy with the results.

The painted pilot and his seat are added to the cockpit and a 'desk' is constructed around him.

The first stage was to attach the bodies and heads of the crewmen to the upholstered chairs I made from greenstuff and plastic, and to paint them. Arms could not be added at this stage, as I intended to build controls around the pilot and his arms would get in the way. They would have to be added later. I find it helpful during such work not to think of man and machine as separate, but rather as all part of one model.

Control panel tops the desk, then arms are added. I also put a steering column in the pilot's hand.

The steering column the pilot is holding was something of an improvisation. The cramped nature of the cockpit, due to my wanting a gunner in the front made it very hard to get the pilot's hands to look like they were manipulating the controls that were very close to his chest. As a result, he is leaning forward in something of an 'action' pose, gripping a long control rod and steadying himself with his other hand.

Gunner is added. A plain flat panel hides his incomplete body from view.

The gunner was much simpler. All I had to do was add upper arms and obscure most of him beneath a flat panel, as if he is hunkered down, right in the nose of the vehicle. His chair fits comfortably beside the pilot's control rod.

From above...

...and the side...

Final Rivet Count... 254! 

 Now I just have to do the other one...

Meanwhile, as work continues on the second Hydrothermicopter, the Flunks, Scagworms, Lord Blandford-Fly's Lancers and plans for a BIG project, I thought I'd also get cracking on the Eternally Lost Tribe of Wutha-F'Kahwi...

Wutha-F'Kahwi warriors in the making...

My models of choice for these notorious warriors are plastic Mahdists from Perry Miniatures. I didn't want to do the Zulu-thing and these seemed just perfect as an alternative. I have two boxes - which will make around eighty warriors, depending on how many I mutilate for other purposes - and I suspect I may need many more.


A tribesman of note leads the warband...

I thought I'd start with a ten-man warband, armed with rifles. Clearly, some nefarious character has been arming the natives with European weaponry...

Rifles?! By what devious devices did these savage killers come by such things...?

I also dug out of my Big Box O' Bits a plastic T-Rex I had previously converted to be ridden by a 1:72 scale plastic knight many years ago. It wasn't a very good job at the time, but now I have a more noble purpose in mind...

Customised Chieftain and somewhat battered T-Rex...

So began the construction of a Chieftain, mounted on his terrifying steed.

Left: straps and barding are added. Right: bits of plastic rod and strip provide the framework for the saddle.

I had to cut a large amount of gunk and glue from the T-Rex to begin, as well as remodelling the rider's legs and abdomen. Next, cloth barding, straps, blanket and an elaborate saddle were gradually added.

The saddle is sculpted from greenstuff.

Once the rider was in place (I intend to paint this as one whole model, rather than paint the mount and rider separately) I thought about extra details. A shield, quiver of spears and scabbarded sword were added. I still have to add reins.

The almost completed model. Spears are plastic rod with spear tips from the Mahdist warriors sprues. Pennant on the lance and jewel on the quiver are from GW High Elves.


A shield hangs from straps attached under the saddle.


I quite like the orange colour of the T-Rex, although I didn't do a good job of the tiger stripes. I'm not sure what colour I will go for in the end. I also intend to produce Wutha-F'Kahwi archers, spearmen and of course the crews for the Flunks. This may take some time...

Oh well. that's it for this post...

A Hydrothermicopter rushes to aid Lord Blandford-Fly, suddenly beset by a bad case of Scagworms...

All the Best!

Thursday, 4 October 2012

Quickly! Get to the Chopper!

Hi, All!

Looking rather nice, if I say so myself...

I am pleased to report this week that work is going well on the British Hydrothermicopters. The first one is almost finished - although cockpit detailing may prove to be a little fiddly...

The two flyers, sans-rotor blades, during early stages of painting. Metalwork is painted black, highlighted silver, then ink-stained.

Engine details... Gold paint will be added next to highlight the brass parts.

Since my last post, I've been concentrating mainly on the first Hydrothermicopter. I'm considering whether to duplicate it, or make the second a slightly different configuration. Time, experimentation, inspiration and alcohol will tell...

Lightning Cannon - almost finished. Guitar strings are added as conduits.

Cockpit details are painted in at this stage. More will be added and painted as the model progresses.

More guitar strings are added to complete the finished engine.

I decided on yellow for the first flyer. I may do the same for the second, although I'm undecided. I've already got red, green and blue vehicles in my British force - and black seems too sinister for Her Majesty's Imperial Air Corps... I'll give this a little more thought...

Upholstered chairs, ready for the crew...

For the next stage of detailing, I have constructed some simple upholstered chairs from plastic and greenstuff. These will be painted and glued in, whereupon the crew will be added and controls will be built in around them. I expect this to take a little time...

Rivet Count:  246! (For the yellow 'un, anyhow...)

Flunks... Almost a happy family.

Work has also continued on the female Flunk and her calf...

Most of the detailing on the cow flunk is done. A blanket and straps will be sculpted soon, before adding a howdah and warriors...

Calf - almost painted. Ain't he cute?

I will soon be able to add the howdahs to the bull and cow, along with baggage for the calf to bear. Then it will finally be time to work on the warriors of the Wutha F'Kahwi...

Just as a rather fun aside, I thought I ought not waste the trunks I cut from the toy elephants that became the above Flunks... Ladies and gentlemen, I give you...

Scagworms! Disgusting!

Scagworms! Not a pleasant thing to blunder across in the untamed depths of the Lost Continent... These took only minutes to complete. I simply glued the trunks to washers, tetured the bases, painted the trunks and finally coated them with water effect for a nice slimy finish. I think they're sufficiently horrible...

Scagworm attack... There is no known medication...

And that's it for another post, folks. Next up: more on the Hydrothermicopters and Flunks... Soon to be followed by Lancers, Warriors of the Wutha F'Kahwi and God-knows-what-else!

Keep watching, folks!

All the Best!

Tuesday, 25 September 2012

Death From Above!

Hi, All!

Lightning cannons armed and ready... Tally ho!

More development on the Hydrothermicopters front this week...

To be honest, I have been repeatedly asking myself, "Why, oh why did you choose to make two of these blasted things...?!"

Largely unadorned Hydrothermicopter... At this stage, I wasn't certain what the big fat nose cone was all about...

Well, I suppose because I can. So I did. But when embarking upon producing duplicate models, one ventures into dangerous territory. The best way to approach multiple-model-construction is to adopt a 'production line' attitude: Do all the green stuff. Then all the rivets. Then the first coat. Then the blah blah blah... 

Tail-plane details are added, along with some nice bendy chimneys...

...And another colourful bead or two. If in doubt, folks, glue on more bits of stuff...

You see the problem? It's boring.


What should be a fun project of discovery and invention quickly becomes a mundane routine. Not to mention the frustration of suddenly realising you've missed bits or can't find another of that part you need that you just glued to the other one...

The cockpit is shaped using plastic board and white Miliput.

Am I ranting? Probably. I tend to do that sometimes...

The fuselage. Landing gear are made from the end of a plastic fork with all but two prongs removed. Piping, brackets and rivets are added. Greenstuff fills gaps and adds detail to the plastic cylinders.

Anyway, I am pleased that I stuck with it, because these two airborne Weapons of Mass Delusion are now looking rather splendid and are awaiting their first coat of paint. Each has been fitted with a Lightning Cannon and soon I will begin adding the aircrews and more cockpit details...

Cockpit detailing begins. At this point, the cockpit will have to be painted before further details and crew are added.

And it feels so good to be able to give you all a....

(drumroll...)

RIVET COUNT!!!!!! (sigh... It's been so long...!)

Each Hydrothermicopter is so far adorned with a total of 232 RIVETS! ...not counting the ones I pressed into the brass rotor blades (they feel a bit like cheating...)

That's 464 rivets so far on this project, doubtless with a few more to come.

So there you go, folks - they're coming along nicely. And have no fear! I haven't forgotten about the Flunks... The female and calf have had a little attention this week, too. But more about that later...

Big Momma Flunk. Taking shape.

Oh well, that's that for this post. More soon!

Wuppa wuppa wuppa, choo choo!

All the Best!

Monday, 10 September 2012

Wuppa Wuppa Wuppa... Choo Choo!

Hi, All!

Hydrothermicopters... Coming along nicely.

I've been having a go at  my British Hydrothermicopters this week.

The gutted toy. This will become a cockpit for a pilot and gunner.

Cogs and rods from the toy's pull-string motor are reattached as motor parts.

As followers of this blog will recall, these started life as cheap plastic toy helicopters which I gutted. Since then, I have mostly completed the rotor blade assemblies and added a few nice bits and pieces to the bodies.

Nose cone and rear rotor take shape with bits from my Big Box O' Junk.

View from the rear.

Of course, there will be many rivets to add... But I'm not quite there yet...

Bases made from heavy washers and clay.

The Hydrothermicopters have been mounted on brass rods. These may be cut to different lengths so that the Hydrothermicopters aren't at identical heights. I have also started building heavy bases from washers. If I get the weight right, I should be able to keep these fairly small without the models falling over. Fingers crossed...

Plastic redcoats from Warlord Games will become the crews...

The crew are being constructed from plastic british redcoats. Kneeling figures have been reshaped to be sitting. Each Hydrothermicopter will have two crewmen - a gunner in front and a pilot behind. I'll be selecting appropriate uniform colours, of course, to suggest Royal Victorian Airforce...

The beginnings of the rotors. A cog from the original toy, brass rod and a plastic wheel from a toy car (bereft of tyre).

The basic rotor assembly atop the vehicle.

Turning my attention to the rotor blades, I have opted for a bat-wing style. The blades were inscribed into brass sheet (from a tomato puree tube) and dotted with rivets. This was actually really quick and easy and I'm very happy with the result.

Above - a finished rotor blade. Below - almost done. The batwing shape is inscribed with a pencil before being cut out.

The first rotor blade, glued in place. Beads and copper wire add detail to the assembly.

I still have to add steam exhausts and landing gear - I'm thinking I'll d a reversed tripod thingy with two feet to the front and one to the rear...

The rotor assembly in place. Additional beads have also been added to the rear end.

I imagine these Weapons of Mass Delusion might take a while, as the detailing required for the cockpit could be tricky. There is also the question of the paint schme. I'll be posting more as they progress, of course.

In other news:

Bull Flunk. Looking good, I think.

The big bull flunk is coming along. I've coloured the blanket, straps and buckles and varnished the model. Now it's time to start on the howdah and crew.

Straps and buckles are done...

... and from the other side...

So there we are for now. More soon...

All the Best!

Monday, 3 September 2012

I Flunk, Therefore I Am.

Hi, All!

Look into my eye...

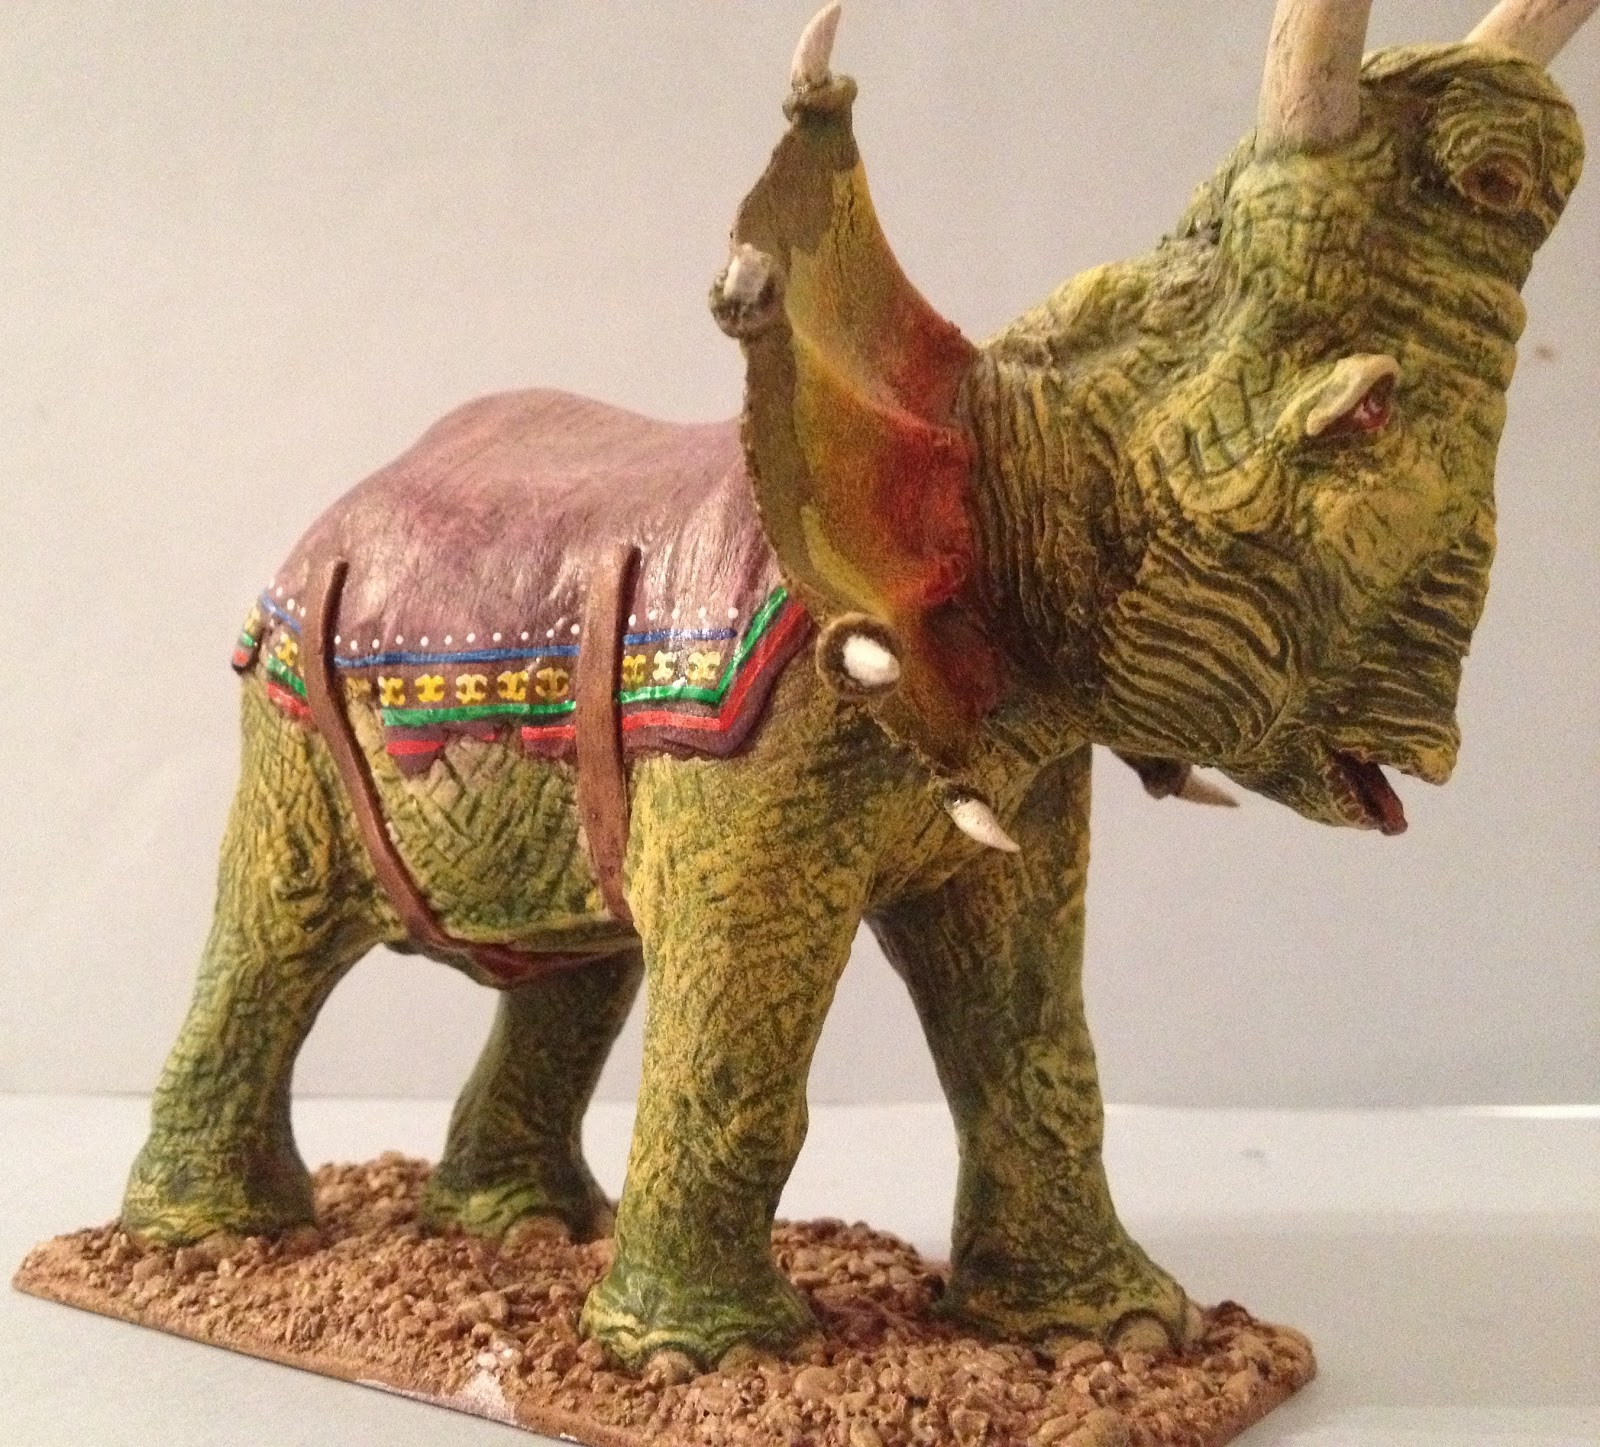
Work continues on the first of my Flunks this week. The painting of the beast is just about done and I have begun straps, blanket and such as a prelude to adding a full-blown war howdah full of screaming Wutha-F'Kahwi warriors...

Brown undercoat, highlighted up to white, plus first wash of dark green ink.

Highlighted with flesh colour over the green wash.

A yellow wash is applied to the whole body.

The techniques I've used are much the same as for my crocodiles: lots of highlights and ink washes eventually give a really nice finish. Greens and yellows work particularly well for this, and I also chose these colours because I want to give a slightly 'dinosaur' feel to the flunks, and to remove them a little from the elephants they once were...

Red, yellow and black washes are applied to the fan.

This creature is an alpha bull flunk: the head of a herd. So I've been having fun with the fan he wears around his neck, colouring it in a flashy manner to attract females to his harem. As such, he will probably be much brighter than the female and calf I am still sculpting.

The fan, close-up. Blood flushes veins close to the surface of the skin to create a colourful display, used to attract females and intimidate rivals.

As you can see from the picture at the top of this post, I am paying close attention to the eyes, too. There is still a little work to do. In terms of scale, these are actually about the size of a man's head - so it is important that they are detailed well. Otherwise, the final model could look rather lifeless.

A base is added, made from thin MDF and sculpted with DAS and grit. Miliput blanket and straps are sculpted.

Once the painting was largely complete, I began work on the accoutrements. This is all fairly simple stuff so far - Miliput was used to drape a huge blanket over the beast, then straps were added. The buckles are just simple pieces of wire. Soon a castle-like howdah will be added.

Buckles and straps.

The miniatures I ordered (sculpted by my good friends, Alan and Michael Perry) have arrived, so I will be adding the crew to this magnificent beast pretty soon, too!

Tally Ho!

I am also happy to report that the heroic Lord Blandford-Fly is now finished and ready for duty! This fine fellow looks absolutely spiffing in his blue and yellow uniform. And I'm really pleased with the way his horse turned out!

Lord Blanford-Fly... Insanely heroic.

If I have a criticism of this officer model and his lancers (from Empress Miniatures) - and given the beautiful workmanship of riders and horses, it's a very minor criticism - it is that they have no eyes. Instead, Lord Blanford-Fly has two big skeletal holes. Of course, these are partly hidden under the rim of his pith helmet, but one tends to notice blind cavalry officers by their tendency to charge the wrong way. Remember the Light Brigade...?


Ready to take on (almost) anything!
Anyway, I still love these models. Lord Blandford-Fly, I'm sure, will be a regular sight on the battlefields of the Lost Continent. His unit of lancers will not be far behind.

So there you have it - for now.

Soon to appear from my dining-room table: British Hydrothermicopters; more flunks; the warriors of the Wutha-F'Kahwi; British advanced weapons company and more!

Side-by-side... For now...

All the Best!