Monday, 23 March 2015

Rivets To Starboard!

Hi, All!

A peaceful evening on board Lord Smudgington Smythely-Smythe's Hydraulically-Motorvated Sextupedal Land-Traversing Vactional Domicile.

When one dives into any project with little to no forward planning and a vague intention to invent as one goes along (as one frequently does - well, this one anyway!) one runs the risk of creating a lot of work for oneself.

Doesn't one?

The entire starboard side is pulled apart.

So it is with Lord Smudgington Smythely-Smythe's Hydraulically-Motorvated Sextupedal Land-Traversing Vactional Domicile.

In particular, one suffers a constant onslaught of new and better ideas, which one attempts to incorporate, potentially resulting in a lack of design consistency and the occasional wobbly bit.

The engine section is glued to its board and a basic cardboard blank is fitted to the leg bay.

So it's a good job one doesn't really care. Nevertheless, some of you out there might (and probably should) so please feel free to learn from my haphazard and eccentric approach to miniature engineering.

I meant to write this blog post last night, but following a fourteen hour session of cutting, gluing, soldering, painting, wood-staining, photographing and of course rivetting, I could take no more. My apologies for not putting in the effort!

Holes are cut for ladders (later) and marked against the ceiling pieces of the mid-deck sections below.

I realised that having made the decision a week or two back to open out the mid-deck section, the support structure I had previously built from foam core because it is lightweight, strong and relatively cheap would no longer do the job. Being thick, it was too bulky to even remotely accurately represent scale, and it would not provide a crisp, clear line to the hull.

It had to go.

So, with jollity, coffee and a big knife, I hacked my vessel to bits, then realised I had removed all reference points, front to back, up to down, starboard to port... "Oh, whoops," quoth I.

New sections are built and tried in place.

Fortunately, I had not yet glued the engine room to the base board I had cut to eventually sit on top of the whole-vehicle chassis. (The keen eyed and pedantic amongst you will note that I previously, incorrectly, referred to this as a 'fuselage'. Please shush.) This meant that I was able to create a 'blank' compartment for the leg bay (where the leg will eventually go - get it?) and then restructure the entire starboard side around this. It also meant that I could turn the aforementioned base board around, effectively moving the leg bay backwards, to where it looks more fitting.

So it wasn't all bad.

The two pieces are joined with a bridging piece, giving greater rigidity and linear accuracy than if I was to continue building a section at a time.

Thus, although I had planned to construct just the rear-most starboard mid-deck section, I actually found myself rebuilding the entire starboard mid-deck as a single piece. Port will soon follow the same process.

A lamp-post is inserted into the painted piece, after first applying a balsa floor.

I am confident that in so doing, I will achieve cleaner lines, greater strength, and better consistency of design.

So there.

The finished piece, ready to insert. Lanterns have been wired and glued-in. Frosted acetate 'glass' is behind the portholes to catch the light of concealed LEDs within the model.

The various parts you see here were constructed as previously described in earlier posts, so I won't bore you. Needless to say, there will be a lot more of this kind of repetitive work, so I'll do my best to keep you all entertained with pretty pictures!

The rear section, in place. LEDs have been installed in the lower deck, in preparation for later.

Looking forward. The cardboard blank in the leg bay will eventually be hidden.

But before the eye-candy, the Rivet Count!

I have added a total of 559 rivets this week, bringing Lord Smudgington Smythely-Smythe's Hydraulically-Motorvated Sextupedal Land-Traversing Vactional Domicile to...

12,678 rivets!

Not content to take my word for it, an over-zealous officer starts counting...


And... as a nice numerical aside, Colonel O'Truth's Miniature Issues has just passed 150,000 hits! So a huge thank you to all you splendid chaps and chapesses!
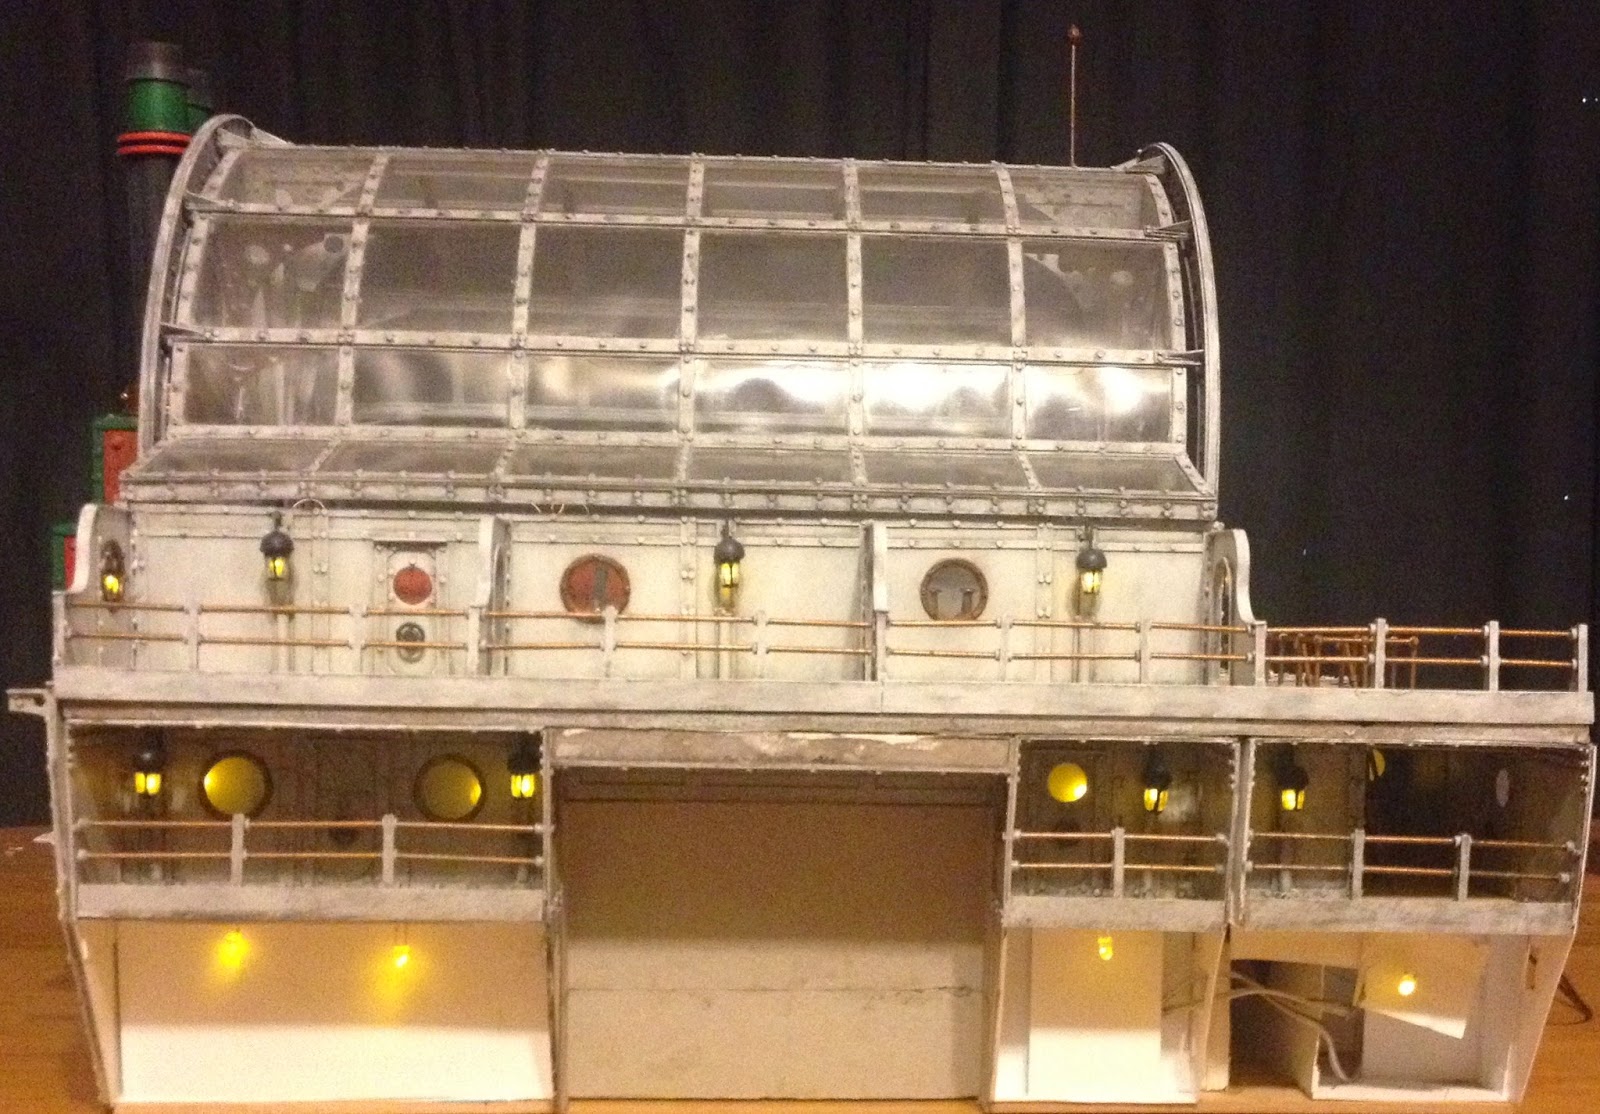
The starboard side so far.

So without further ado, here are some more nice pictures! Huzzah!


Next week, I'll endeavour to make a good go of the port side mid-deck, and I'll be discussing the remarkable similarities between giant severed lions' heads and late nineteenth-century steam-driven artillery.

All the Best!

Monday, 16 March 2015

Making Life Complicated

Hi, All!

Jeeves sneaks away to the engine-section-starboard-for'ard-mid-deck gallery for a swift tipple...

I have had something of a busy week with Lord Smudginton Smythely Smythe's Hydraulically-Motorvated Sextupedal Land-Traversing Vacational Domicile this week, putting in around twenty-three hours of work this weekend alone!

The rear gable is built and fixed into place.

It all started innocently enough, working on a couple of the items I had resolved to finish - namely, the rear-end gable of the barrel vault roof, and four little ladders for various parts of the engine room. But then I went and got ambitious...

Ladders are constructed from plastic strips, marked at intervals for regular spacing of the rungs. And a little hatch - for later.

An unpainted ladder is checked in place.

I just can't help myself sometimes.

I won't go into too much detail about the barrel vault gable here - it was constructed in the same way as the one I discussed in last week's post. This new one is slightly less ornate, lacking the decorative discs and boasting only 193 rivets...

Four finished ladders in their final positions inside the engine room.

The ladders were simply constructed from 2mm strips of plastic board and 12mm lengths of rod. Each was checked in its position to ensure fixings were at the correct heights, before painting them and gluing them in place - the work of maybe an hour or so. They can be a little fiddly at times.

I also started messing about with severed reptile heads. After all, it's been lovely weather for it...

The first of many trophies are prepared for display.

I have decided that a large portion of the mansion section will eventually house a trophy room, full of Lord Smudgington Smythely Smythe's bizarre souvenirs from his many foreign jaunts (see also 'pillage'). The first of such treasures are three huge reptile heads, which His Lordship's trusty manservant Jeeves has lovingly scrubbed clean of plasma burns, stuffed and mounted on wooden plaques. All of these began life as horrible cheap plastic toys, at maybe a couple of dollars each. Amazing what a lick of paint can do!

The starboard corner is aggressively modified.

And then, I had an idea.

The mid-deck gallery is designed and pieced together.

I mentioned last week that I wished to add further detail to the deck section in front of the engine room, and also that I had decided that a row of portholes to depict the mid-deck was simply not enough detail. I have resolved, therefore, to depict the outer-mid-deck sections as open galleries with handrails to match the top deck. Doors and portholes within these new details will be lit from behind, hinting at further goings-on deep inside the vessel.

A hole is cut through the top deck, checked against the new detail below, and a trim is built for the edge.

I started with the Starboard front edge of the engine section, and decided to link it to the the top deck with a stairwell. This gave me the opportunity to add more pretty brass hand-rails!

The gallery - riveted and painted, waiting for a roof, hand rail and lamp post.
During this process there was a lot of checking, rechecking, modifying the existing model, rearranging, checking again... and a little bit of grumbling. Particularly when it came to soldering the LEDs. I hate soldering.

Stairs are constructed.

The walls, hand rails and other details all follow the same configuration as those of the top deck, so it was a good job I'd noted down measurments such as porthole sizes and heights from floor level and so on in my trusty notebook. There is a lot more of this to come!

The unpainted stairs are checked in place. They also have to be checked against the hole in the ceiling. I have yet to add the lamp post.

In building the stairs I had to be precise. I decided to set them at an angle of 45 degrees because it's fairly simple to work with. I planned and cut all the components at once before gluing anything, and was careful to make sure it all sat properly. One thing to be aware of with this kind of thing is that the stairs should not be made to the height of the deck alone - they have to also take into account the thickness of the ceiling and distance to floor of the deck above. This in turn effects the horizontal length of floor space required. These stairs ascend 56mm, and therefor take up 56mm of length on the floor.

The painted stairs and trim with hand rails added.

It's not as complicated as it sounds. Promise.

The ceiling is cut and detailed. A miniature structural I-beam helps to add stability - for real!

Where it got a little tricky was when I got to the ceiling. As the mid deck is now open, the ceiling is visible, so a detailed piece was needed. This meant that the gallery had to be painted and finished, the stairs glued in place in the correct position to correspond with the upper deck, the ceiling added, the required electrical wiring soldered and tucked away, then the whole thing positioned under the top deck, and finally the trim put in place... And by this point my hands were shaking, following the consumption of over two litres of coffee...

The enclosed mid-deck gallery, about to be put into place.
 ...And suddenly, there it was... Done!

All in place and looking great! From above.

I have to say, I am absolutely thrilled with how this bit turned out, and rather than being daunted at the prospect of more such pieces along both sides of the vessel, I am looking forward to seeing it take shape. It's a lot more work than a simple row of portholes, but this kind of creativity, design and challenge is what this hobby is all about for me.

The top deck by night, with a glimpse of the mid deck.

Gas lighting illuminates the stairs.

So once again, it's time for the Rivet Count!

This week I have added a nice pile of 802 rivets, bringing the total so far to:

12,119 !

I now expect the final count to easily exceed 50,000... Trying not to think about it...

All is peaceful.
As an aside, I have been asked to show sketches of the final project. So here is a recent one.
This is a concept only - as I have shown in today's post, I am designing this monstrosity as I go, and anything could happen!

Lord Smudginton Smythely Smythe's Hydraulically-Motorvated Sextupedal Land-Traversing Vacational Domicile - concept.

Wow - this has been a long blog post! It's time for my beauty sleep!

An officer takes his ease in the glow of a lamp post.

Much more to come -  thanks for reading.

All the Best!

Sunday, 8 March 2015

Fixing a hole where the rain comes in...

Hi, All!

The engine room continues to evolve...

This week, I have been concentrating on a couple of the larger details for the engine room section of Lord Smudgington Smythely-Smythe's Hydraulically-Motorvated Sextupedal Land-Traversing Vacational Domicile.

First up: a nice big chunky gearbox...

Big fat plastic cogs - who could ask for more?!

As I mentioned last week, I feel that the large open areas of plain deck surrounding the engine room are rather boring. I dealt with the two sides in my last post, adding bulkheads and handrails, so now it is time to do something about the area to the front.

The area to be modified. Behind the windows, you can just see the chain drive and engine.

I've got quite a few impressive looking cogs lying around amongst my useful bits, so I decided to put a couple to good use as a gearbox, protruding from the deck as a continuation of the massive chain drive inside the engine room.

The box is constructed and checked for fit. The cogs are mounted on axles which pass through the side walls to ensure everything sits nice and straight.

This was a fairly simple piece to put together, being essentially just an open box with some cogs inside, but even though most of the finished piece is hidden, I did not allow myself to skimp on details - rivets abound!

The various components, detailed, rivetted and ready for paint.

Having quickly designed a box, I took my time ensuring that eveything lined up properly - this piece would look awful if the cogs didn't sit stright with the line of the vessel. Axles were inserted into the cogs and fitted into holes in the walls of the gearbox. When I was happy with this, it was time to add details and rivets, paying particular attention to the top piece, where a hand-rail would also be required.

The painted components.
The finished gear-box, with hand-rail. Almost all of the interior details have become invisible - but we know they are there, don't we?!

Now all that remained was to paint the components, glue them together and cut a blooming big hole in my nice balsa wood deck! As with fitting the gears to the box, this had to be precise, as a bad fit would look absolutely dreadful, to the detriment of the whole model.

The gear-box in place. I'm happy with this!

Finally, the gear box was glued in place. I am planning a different detail for the other side of this part of the deck - more about that soon.

There are gaps in my design!

The next thing to tackle was an item on my list that I have been putting off - the front gable end of the barrel vault roof.

An arch is constructed on plastic board and checked against the barrel vault in front of a bright light.

The front and rear edges of the roof were not previously completely finished, and I had intended to add arched details to disguise the overlapping edges of the various bits. As I mentioned last week, I have resolved to address all such outstanding issues before moving on to build the rest of the model. I will have to make a second gable for the rear of the roof - but I'm running short of materials and as you can see, I need a whole sheet of styrene just to cut out each arch.

As detailing begins, the piece is repeatedly checked against the roof, to ensure it will all line up nicely.

I took my time with this - it needed to fit precisely with the lines of the roof, and working with curves can be a pain in the proverbials!

The front of the completed arch.

By adding strips of plastic to the outer and inner edges of the arch, it became a curved girder, and was surprisingly sturdy. Little disks of plastic were added for decoration, stamped out of off-cuts of styrene, and rivets were generously applied!

The finished arch is checked against the model again... You can also see the almost-completed gear-box in place.

Now came the fiddly bit. Seven brackets were needed to attach gable to roof, and everything had to line up.

Brackets, sir. Seven of 'em.

The brackets were simple in principle, being cut from 4mm strips of styrene. A little bit of detailing with thinner strips and a few rivets made them look the part. Now to glue it all together...

The painted brackets in place between gable and roof. Some adjustment was necessary as the glue took hold.

I had already left space for the brackets when constructing the roof, so I had a good idea of what I was doing, but getting it all to stick together and stay put was still a bit of a pain.

Et voila! Done!

Which brings me to the rivet count...

I have now reached the somewhat silly figure of...

11,317 rivets!

Looking pretty good, I reckon!
Next up, I will continue to add details to the engine room section, both above and below decks, with gantries, the rear gable, a stairwell, some ladders and whatever else seems like a good idea at the time!

All the Best!