A few days ago I received an email from a splendid chap named Nate, who inquired about an early creation of mine: namely, Pantagruel.

As you may know, Pantagruel was the first Steampunk/VSF creation I made, and was the predecessor to the HMSW Gargantua and the (ongoing, possibly forever...) gigantic walker, Lord Smudgington Smythely-Smythe's Hydraulically Motorvated Sextupedal Land-Traversing Vacational Domicile.
 |
| Pantagruel! Still puffing along, after all these years! |
Anyway, Nate asks whether I can go into a bit more detail about the construction of Pantagruel and provide some better photographs, as the ones I have previously posted are, in his words, "a bit fuzzy"...
After I'd wasted half a glass of damned good Cognac, what with spluttering indignantly over the 'fuzzy' remark, I politely replied and said I'd see what I could do. So without further ado, I shall hereby attempt to provide some clearer insight (and photographs, Nate!) of the aforementioned walker!
 |
| A gyrocopter's eye-view |
This project was the first very detailed model I had made in a long time, and I learned a lot during the process: I had to use several different adhesives; I used wood stain on balsa for the first time (which was absolutely essential knowledge when I came to build Leadwood); I had to have the patience to finish numerous components before assembling them, and I rediscovered my love for inventorisioning and creativising, and such like.
Pantagruel is essentially just a boat with a boiler and smoke stack, on legs. The boat part was the easy bit, being constructed of thin card (for strength), with balsa sheet applied to inside and out, to give the illusion of planking. This was 1mm balsa, scored with a traditional HB pencil into 4mm wide planks. Nails were dotted in, along with joins where I wanted them, before the balsa was stained with water-based wood stain. This was applied heavily but immediately wiped off with a rag. When dry, a fairly heavy coat of sand-brown paint was dry-brushed across the grain. You can find out more about this technique in my early posts about Leadwood and the tutorial I wrote for constructing wild west buildings.

The reinforcing ironwork (in green) was created from brass sheet - acquired from tubes of tomato paste! It was cut and/or scored with a knife and the rivets were dotted in with a blunt pencil (note that a sharp pencil will go through...) This is great stuff, which can be easily smoothed, shaped, cut...
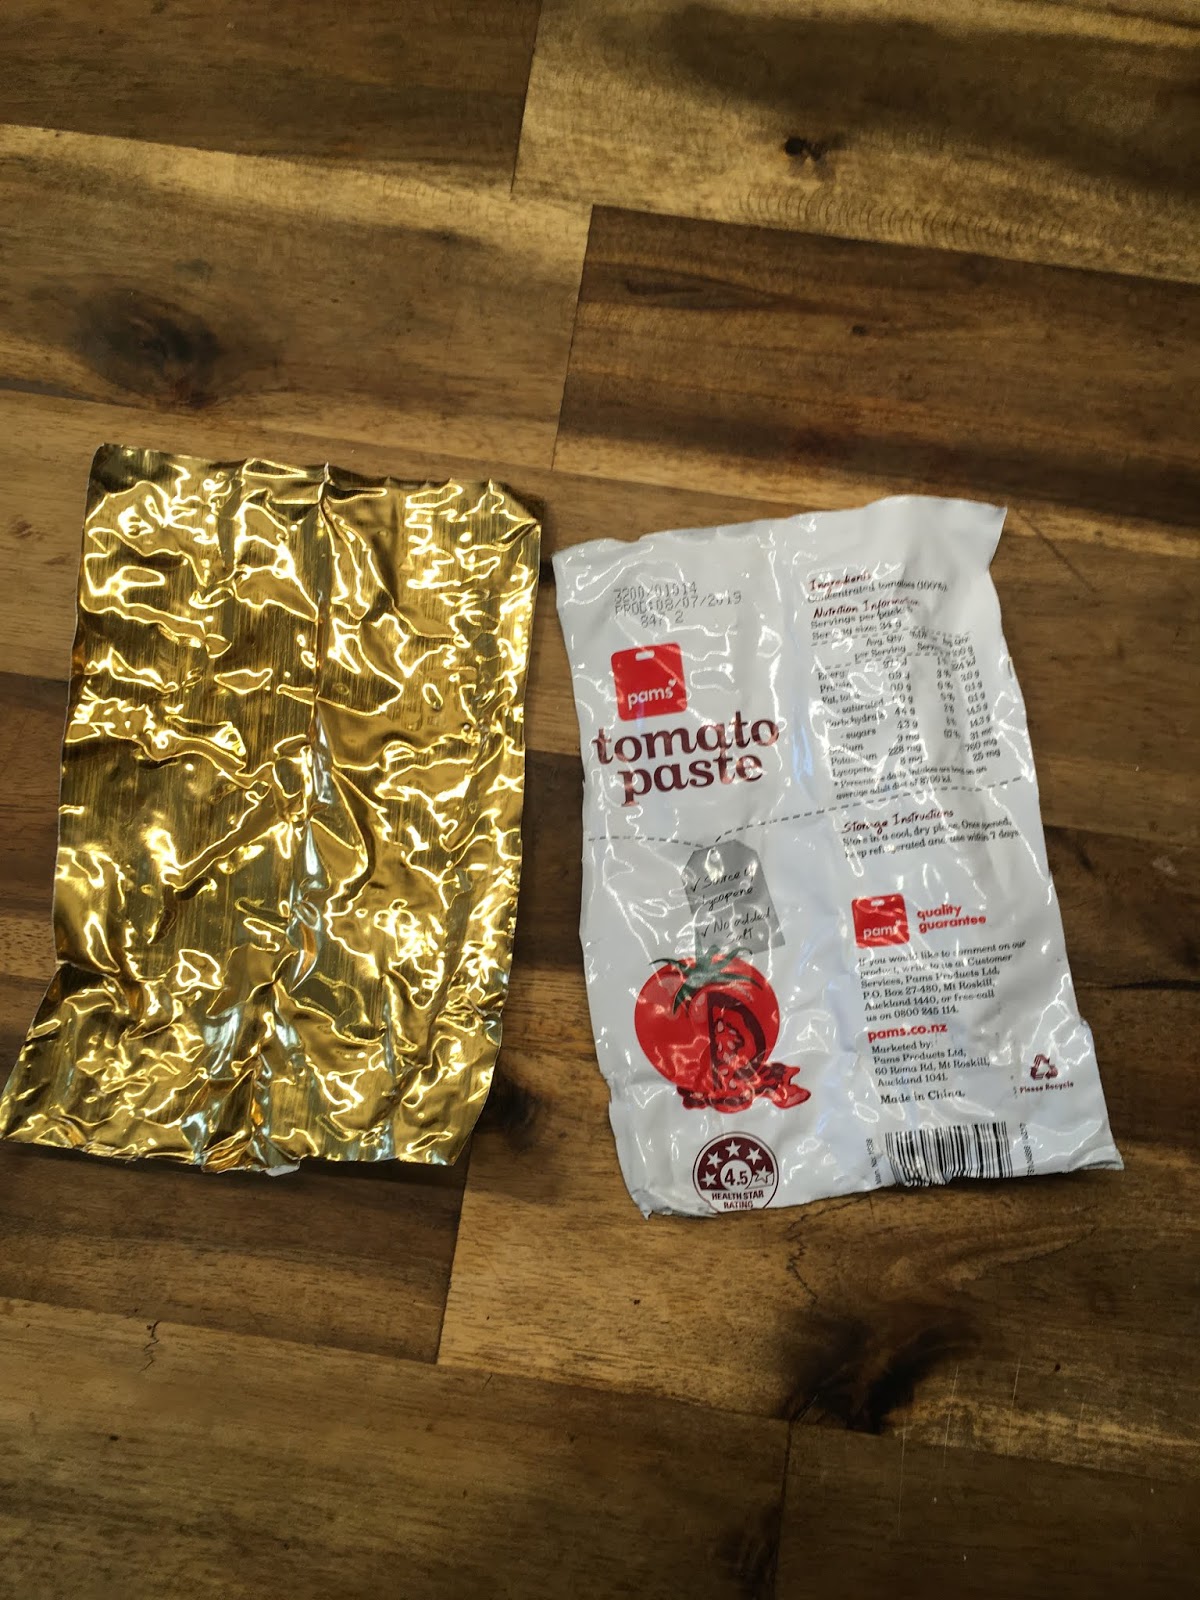 |
| Eat more Italian food! It's good for your hobby! |
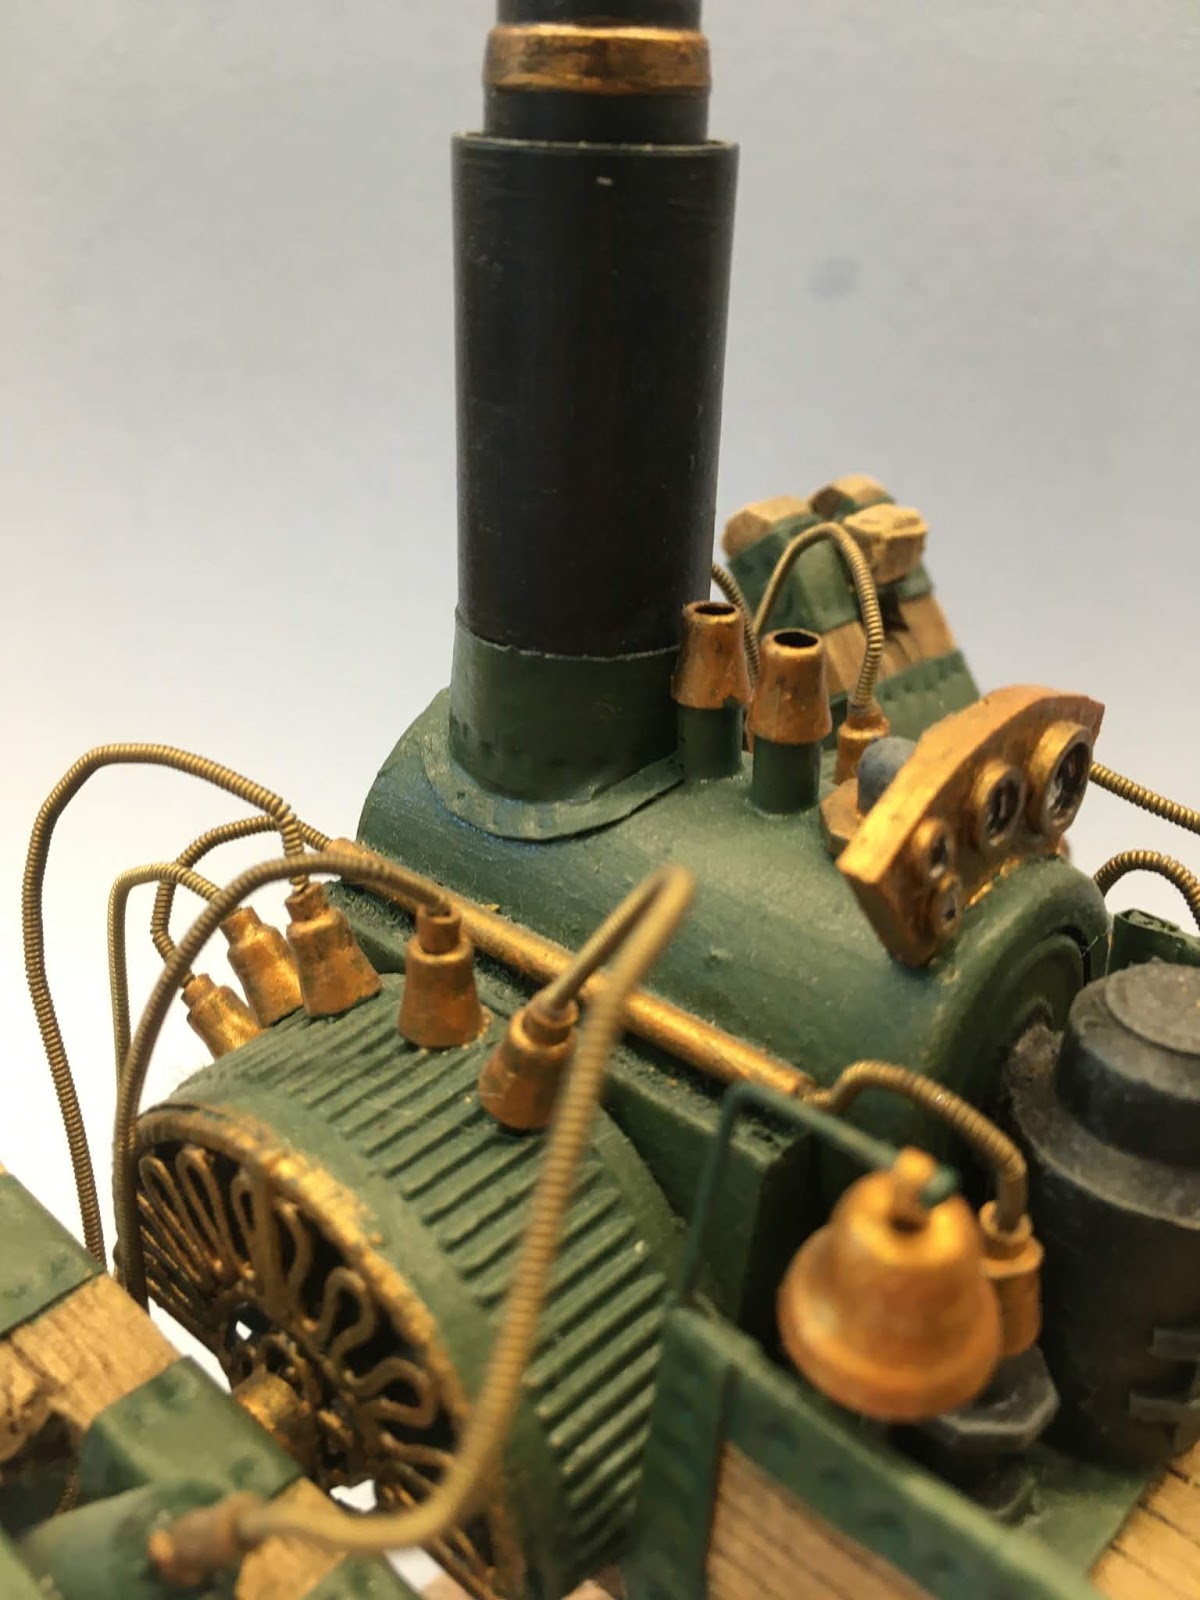 |
| Boiler and hip details. |
 |
| Fire box, bell, gauges and other what-nots. |
 |
| Driver's controls and coal bunker. |
The boiler was constructed from a battery and parts of a permanent marker. The flashing at the bottom of the smokestack is more brass sheet, while the firebox is again part of a marker pen, with detail added in thin card.The smaller components are bits of irrigation thingummies from a hardware store. The bronze-looking display with the gauges is a piece of thick cardboard with slices of plastic tube glued on. The gauges were painted white and detailed with a fine black drawing pen. The driver's display was made in the same way, with levers added made from bent dress making pins. The coal is just grit, glued onto a card backing and painted a slightly shiny black. Finally, the sort-of-filigree design at the rear and sides are cheap bits of jewelry from a craft store.
 |
| My magnificently adorned rear end! |
The 'hips' are two halves of the lid of a plastic medicine bottle, adorned with more irrigation parts and decorated with the same jewelry bits as the rear of the boiler. The bell also came from a local craft store (about $1 for 12 or so) and is mounted on a bent dress-making pin.
 |
| Hip, upper leg and first piston... |
Now for the legs and feet...
The legs and feet are made from thick (6mm) balsa wood. They were cut into their component shapes and detailed with pencil as noted above, before being stained and highlighted. As you can see from the NOT AT ALL FUZZY photographs, they are actually pretty rough, as I hadn't developed the patience to sandpaper all the tiny things... Again, reinforcing details of brass sheet were added.
 |
| Left foot, ankle and lower pistons. |
All of the various pistons were planned and made from plastic rod and tube. Each had to be kept as an adjustable component until I was sure I had the legs in exactly the right positions. Then the pistons were glued and painted, before being permanently attached to the legs. Each one has an inlet valve near the top that would later be plumbed-in to a guitar string conduit, and an outlet valve near the bottom. More about the guitar strings shortly...
 |
| For a sense of scale, the base is made from two CDs. A clear plastic rod supports the body. |
As you can see, the model's weight is actually taken by a clear rod which is firmly attached to the underside of the body. This was largely due to my poor planning and over-enthusiasm, and something I gave a lot of thought to in subsequent creations. Gargantua for example, is solidly free-standing. With Pantagruel, the legs were pinned to the body with long nails which pass through the upper legs and pistons into the hip assemblies. This is not a robust arrangement and could have been done much better.
The very last details were the conduits. These were made from old bronze-wound acoustic guitar strings, which look great in my opinion and do not need to be painted at all. Each of these had to be cut to the right length for its particular place, and shaped with pliers to look right. This is fiddly work, as they retain a bit of spring and can easily damage the model once glued into place, as they can pull it apart again.
Finally, a note about adhesives and paints:
The following glues were used:
- PVA (wood glue) for gluing card to card, texturing the base, and gluing grit into the coal bunker. DO NOT use cheap PVA (sometimes marketed as 'School Glue') - it isn't worth it. Spend a bit more money on decent aliphatic wood glue - a little goes a very long way.
- Superglue for gluing non-porous materials to other non-porous materials (i.e. metal to plastic). Feel free to use cheap superglue! I do.
- Balsa cement. For balsa. Obviously. This is amazing stuff to work with. There is no better alternative.
- Araldite / epoxy. For gluing brass sheet to Balsa, and securing nails through the balsa joints (legs). Stinky and horrible. I've always hated it, but it really does a good job.
- Polystyrene cement. Used to be commonly referred to as 'Airfix glue' when I was a lad. For gluing styrene plastic tubes (pistons) and other details. In combination with styrene plastic, probably my favourite medium to work with. Use the liquid form with a little brush, not the stuff that comes exploding out of a tiny tube and ruins your work.
Paints:
- Most of my machines are painted using test pots of acrylic house paints. In this case, paints and wood stain by Resene. There is a massive range available in your local paint store, at a fraction of the price of hobby/miniature paints, and I have yet to experience any real advantage to paying for the more expensive (and tiny) pots. Back when I made Pantagruel the only expensive paints I owned were metallics, but even these are available (and they are good!) from my preferred range now.
- I also favour acrylic artists' inks for washes. As followers of the blog will know, I colour creatures and people this way, rather than paint, but for machines they are really only used to 'dirty up' metal colours. With Pantagruel this took the form of a bit of chesnut brown ink on the bronze bits.
 |
| Just some of me previous creations, safe behind glass! |
So there you go. I hope this episode has been informative and helpful!
For what it's worth, there's a Mark II version of Pantagruel on the old drawing board, and I'll be letting you know how that goes! In the meantime, I have hundreds of tiny goblins to paint, a castle on a dinosaur to finish, a wizard's tower to complete, the ongoing life-sapping concept that is Lord Smudgington Smythely-Smythe's Hydraulically Motorvated Sextupedal Land-Traversing Vacational Domicile and God only knows what else!
All the Best!
What an absolute joy!
ReplyDeleteOooh, Michael! You flirt!
DeleteA splendid vehicle, my dear Colonel! I remember it fondly, and reading your account of its construction inspired a creation or two of my own. Nice to see it again in definitely non-fuzzy imagery.
ReplyDeleteAJ, old bean!
DeleteYes -always good to take a trip down memory lane once in a while! Pleased to have been able to help spark the imagination!
Thank-you for going to the effort of writing up the step-by-step of the build process. I know these kind of posts aren't something that are quick to pump out.
ReplyDeleteThis walker reminds me a lot of the first GW Sentinel, but in SP style. I really like how you went about creating it. The overall effect is quite impressive.
Well done!
Hello, Mr Papafakis! And thank you.
DeleteYes - these posts can be a bit labour-intensive but worthwhile, I think. And it was a nice trip down memory lane!
Glad you like Pantagruel - it's fair to say that without this model, none of my other creations would have happened!
"Just" awesome ! (and more!)
ReplyDeleteI love Steampunk style but I'm unable to build such machines, my respects Colonel.
Thanks for the tips about material, paint and inks !
Thanks, Sam Wise - and you're welcome for the tips!
DeleteCurious to know why you think you 'are unable' to build such machines. It's my intention that this blog should be informative and encouraging - so please feel free to read the articles, email me questions to let me know where I can clarify any techniques and such like, and maybe we can get you to change your mind!
Far be it for me to throw myself in Nate's dungeon, but . . . dimples . . . not rivets! Lovely; nevertheless!
ReplyDeleteH
You are, of course, absolutely correct, Hugh. Consider yourself removed from my Christmas card list!
DeleteThis model was built before I discovered my obsession with hand-gluing thousands of rivets. It was a happier, simpler and more innocent time for me, and I rarely had to take off my socks to count to big numbers.
As crazily inspiring as ever. Your work ALWAYS brings a smile to my face.
ReplyDelete