Monday, 18 June 2012

Take Me To The River

Hi All!

The stalwart men of the Royal Navy rush ashore...

As threatened, I have devoted this weekend to making terrain for a change - which, after all, was how this whole blogging thing started in the first place.

I have always liked rivers on my gaming tables, so I decided I should create one as a start to my new VSF terrain project.

The river is gradually shaped from 25mm green foam board. The flood-plains are roughly carved, to be sculpted with DAS later.

Several years ago, while browsing the pages of the now-legendary Major General Tremorden Rederring, I came across the suggestion of using coloured cellophane as water - a tip that I have used to good effect on a number of occasions since.

Shaped riverbanks and islands loosely laid in place on a bare MDF board.

Those of you who are familiar with this blog and Leadwood in particular will have seen the beautiful results one can achieve using Woodland Scenics Water Effects. I am still a fan of this. However, it cannot be denied that such materials are expensive - hideously so if creating a whole table - and these days I don't have the budget. Also, they are not at all quick to work with.

Boulders are sculpted from DAS and a test sheet of green cellophane is laid down.

Cellophane, on the other hand, is really cheap and can look stunning, if you're a bit clever with it. (Notorious Greg and I used blue cellophane over a dark blanket to photograph my pirate ruins last year). So I set about designing a large set-piece river with cellophane in mind.

Boulders are undercoated dark grey, then highlighted, then a brown undercoat given to the rest of the riverbanks. Sergeant Tetley regards the barren riverside wasteland.

I had also mulled over one of the issues that model river banks often present - namely; that they tend to be rather steep. Notorious Greg and I had had a conversation some time ago in which he suggested a 'flood-plain' effect - i.e. a two-level riverbank with lush greenery near the water and lighter, dryer coverage higher up. I decided that this was a good plan and started carving...

Before applying static grass.

When the boulders are dry, a coat of goop is splodged on (technical term - look it up) and static grass is applied - lots of dark green near the water, with lighter tones further away. Shown here against bare MDF.

The board I am building is 900mm x 1200mm (3' x 4') and will be double-sided so that I can flip it over and just use plain ground. The riverbanks will be stuck down, but the various 'islands' will be loose, to give me a few options for change. I intend to build a couple more boards later, with rivers of different widths. These may - or may not - be planned to fit end-to-end with this one. I am considering whether one should be made with blue cellophane.

A riverbed effect is painted onto the MDF board using layered tones of greys, browns and greens. The banks are laid down to check the layout.
Boulders, grass and cellophane - starting to look finished.

The overall theme of this project will be a Lost Continent type affair, with jungles, arid grasslands, mysterious ruins, et al. Obviously, I'd like to get cracking on the detail pieces, but a table is sort of necessary to begin with, so I'm fighting my urges and doing the groundwork first.

There is still a bit to do on this piece - the depth-painting in the river needs more contrast to give clearer gradiation between shallow and deep, and once the banks are glued down, they will need to be properly blended in - but by and large, I think this is a promising start.

Keep watching - I promise things will get much more interesting soon!

Big Mike's wagon train and the Bazalgette Light Armoured Perambulatory Contrivance head into enemy terrain, not even stopping to admire their lovely reflections in the water...

All the Best!

Sunday, 10 June 2012

Bazalgette Gets A Bit Cagey

Hi, All!

Finished at last!

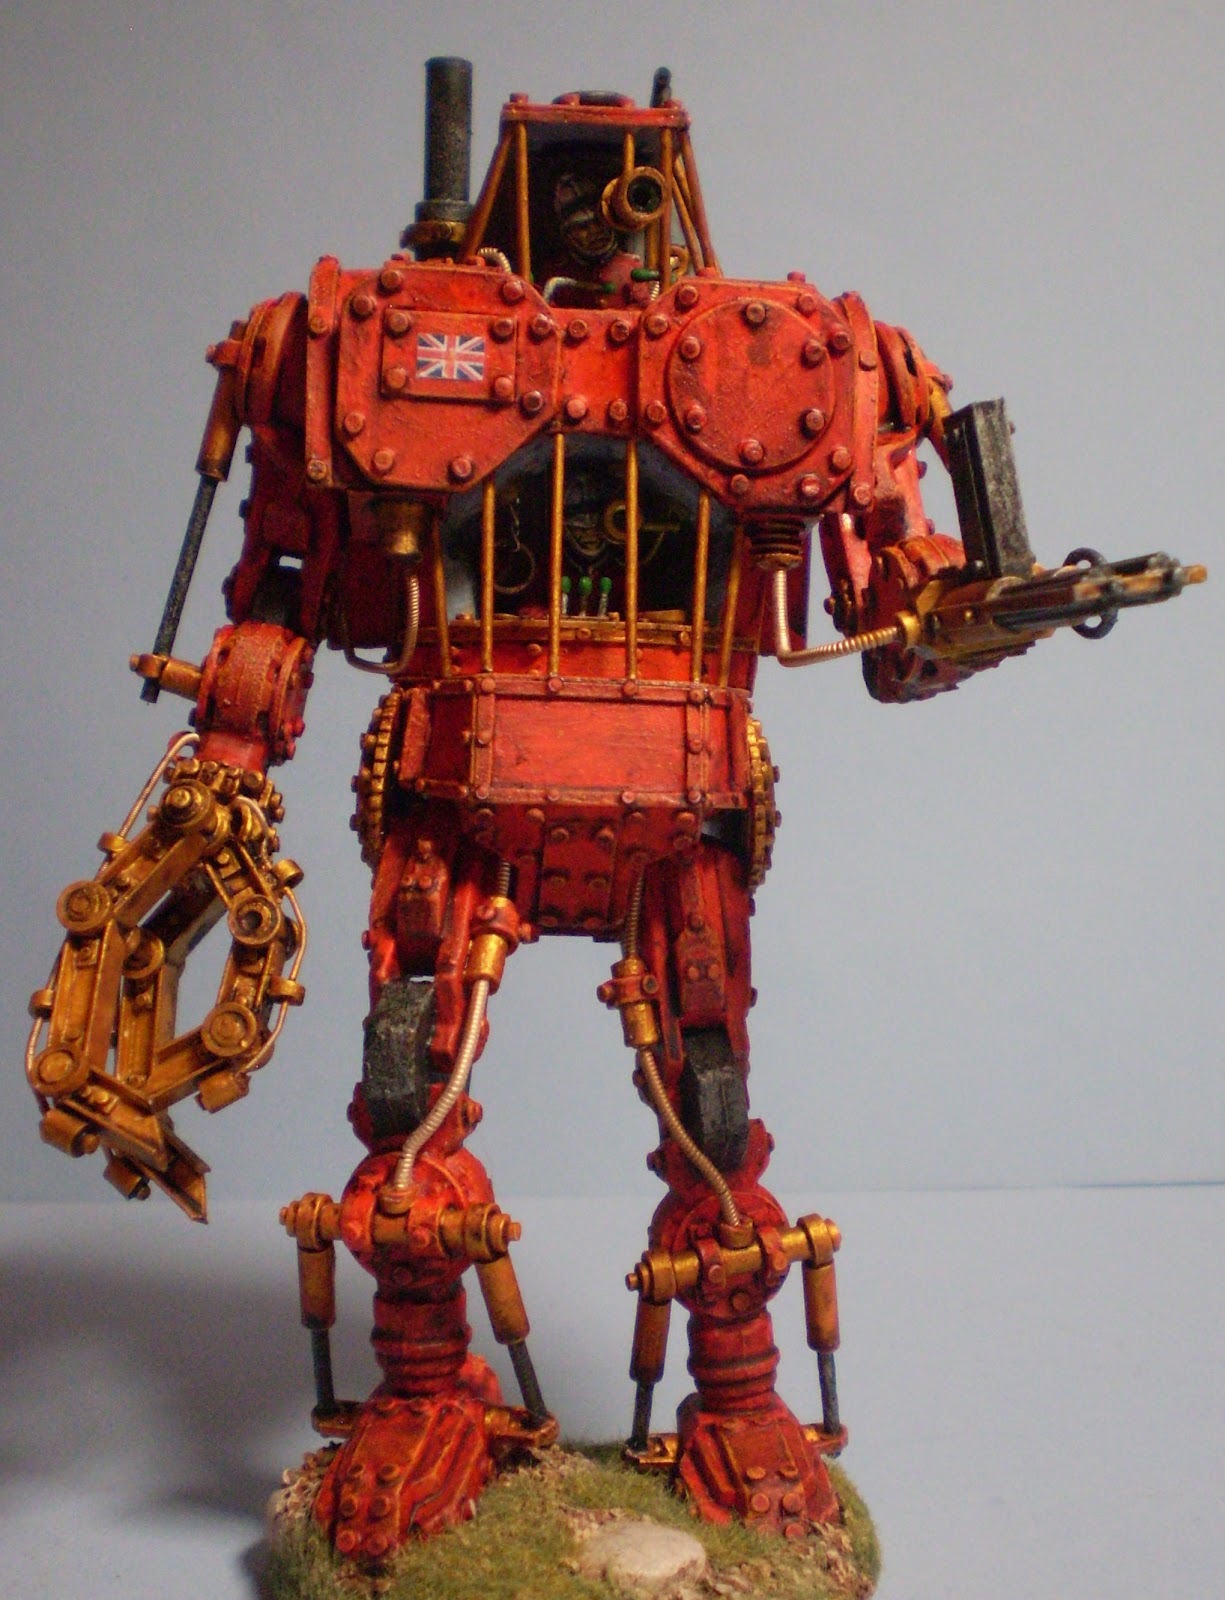
Well, here it is then: the finished Bazalgette Light Armoured Perambulatory Contrivance. This started as a simple conversion of a child's toy and became something of a major project. I've learned a lot in the process and I'm very happy with the final product.

Interior details remain visible, while crew are protected.

I had previously intended to glass-in the crewmen's compartments, but after a little experimentation, and in response to some comments from readers of this blog, Lead Adventure Forum and The Miniatures Page, I opted instead for a protective 'cage'. This, I feel, looks more appropriate to the period and the genre - the acetate 'glass' panels I tried looked far too modern.

Gunner Theakston has a great vantage point from which to rain destruction upon the enemy.

Captain Jethro 'Gutsy' Whitbread commands from within the belly of the beast. 

I also flipped over the twin-mounted Gatling guns, so that their magazine is on the top, as a Gatling gun should be. This was a relatively simple change and well worth it in my opinion.

The corrected twin Gatling guns.

Another small touch was to add a little bracket above the right wrist, enclosing one of the conduits. Previously, this conduit had lain unsupported at an odd angle - it just wouldn't sit like that in real life!

Left: without bracket. Cables don't hang like this! Right: the added bracket helps to make some sense of the design.

A final addition was a slightly comical telescope for the gunner, forming a sort-of-eye for the machine. I think it adds character.

A telescope adds a touch of life to the machine.

So there you go. Another Weapon of Mass Delusion completed. And possibly the last for a few weeks.

I'm expecting a busy time at work for the next week, but I hope to find time to start on some terrain I have planned and also to finish basing my British redcoats and sikhs, which will complete the army (for now!) Then it's on with some special projects I've been thinking about, including working on a new force to face the Brits - possibly the Chinese...

More soon.

All the Best!

Sunday, 3 June 2012

Hours of Handiwork...

Hi, All!

Bazalgette Light Armoured Perambulatory Contrivance - looking pretty handy...

Today has seen the Bazalgette Light Armoured Perambulatory Contraption almost reach its completion.

The canopy is on, the paintwork is finished - and most importantly, she now has a super-intimidating right hand!

Head Canopy: Top - Basic exterior hatch, and with detailing. Bottom - Interior details (never to be seen again!)
The canopy in place and painted.

Gunner Theakston relishes the shade of his nice new canopy.

Needless to say, the hand was the bulk of today's work. Made from styrene 'H' girder, tube, sheet and rod, it took a lot of patience and a certain amount of foul language to complete. Even then, inserting guitar-string conduits without ripping the whole assembly apart was a challenge.

Hmmm... Something's missing...

The hand takes shape. this was very fiddly, fragile work.

But I'm very happy with the result.

The finished hand, with conduits. The guitar strings put tension on the joints and almost pulled the whole thing apart a couple of times.

I've also varnished and based the model now. The varnish had to go on before glassing in the chest and head canopies with acetate sheet (tomorrow's job) as the varnish would otherwise 'smoke' the glass.

Closeup of the hand. Intimidating, eh?

The Rivet Count on this machine has now reached 505 - and is not likely to climb any further, although you never know...

Based and varnished and looking almost done. A good feeling.

I'm thinking that this will be my last Weapon of Mass Delusion for a little while, so that I can concentrate on terrain for a bit.

I Crush Your Head...

Anyway, I'll be sure to post again as soon as the 'glass' is in place. Watch this space, folks!

All the Best!

Wednesday, 30 May 2012

Suit You, Sir!

Hi, All!

Bazalgette Light Armoured Perambulatory Contivance - ready for battle! ... almost...

I've been threatening to update my reports on the progress of the Bazalgette Light Armoured Perambulatory Contrivance for a while now, so as she's starting to look almost finished, I thought I ought to take a moment...

Lieutenant Boddington gets a little excited as the new terror takes shape

...there. That was nice...

Anyway, as you can see, I've made quite a bit of progress since my last report on this project.

Body detailing, gatling guns and pistons are added.
Details are painted. A fairly simple pallette of red, brass and black. Ink washes and drybrushing add depth and weathering.
Up-close and personal..

The BLAP-C now sports pistons in all the right places; guitar-string-conduits; many, many rivets (wait for it...); a twin gatling gun and somewhat detailed controls for the gunner and driver. All that remains is a mechanical right hand (still in planning) and glass canopies for the head and chest...

Leg details: pistons drive knees and ankles.

Guitar strings are added after painting. And a lot of rivets, of course!

This creation took something of a back seat while I worked on the Thomson Tank-Engines (see my "Weapons of Mass Delusion" page) - and I'm glad it did. Coming back to it a little at a time has definitely produced a good result. I was becoming impatient with this machine, and was in danger of rushing it. Walking away from your work can be a very good thing sometimes.

Boiler and chimney - before painting.

Boiler, access ladders, steam conduits, etc. after painting.

I was recently e-mailed by Nate, a fellow enthusiast. During our correspondence, I pointed out that no project ever ends up exactly as you imagined it would - you never really know what you've got until it's finished. This is definitely true in the case of the BLAP-C. I picked up a cheap, simple toy and thought, "Hmmm... This should be a nice quick, easy project..."

How wrong I was.

That said, I didn't expect to be as pleased with the result as I am (so far - touch wood!).

The driver - comfortable and in control, but no doubt wondering when his bullet-proof glass canopy will be installed.

In theory (note the disclaimer - very similar in context to the preface, "Allegedly...") there is not a lot left to do. I need to build the right hand, glass-in the chest and head, and detail the base. British markings, etc. will be added here and there.

Cockpit details. I was in danger of skimping here. Glad I took time out.
Green knobs on the levers contrast with the rest of the colour scheme.

Soon to be closed-in forever...

Other than that, she's more or less complete. Which is a nice feeling.

I started this blog just over a year ago, mostly featuring Leadwood, my Wild West town. Back then, I figured I would largely be sharing insights, tips and techniques regarding terrain-building. Hmmm... Let's take a look at recent work...

HMSW Gargantua
The Faraday Galvanic Field Gun (and Big Mike)
The Thomson Tank-Engines
The Bazalgette Light Armoured Perambulatory Contrivace

Maybe it's time I made some terrain for a bit? After all, my awesome British Victorian Sci-Fi army doesn't actually have a battlefield right now.

Wouldn't want to disappoint the lads, eh what?

Not a knees-ey photograph to take...

Oh yes, almost forgot... Rivet Count so far: 414!
 
More on the Bazalgette blah blah blah soon!

All the Best!

Monday, 28 May 2012

Good Sense Prevails

Hi, All!

Thomson Tank-Engines. Armoured and ready.

I was surprised at the response my latest creations received both here and on various wargaming forums... Not many comments at all, and mostly positive.

"Hmmm," thunk I, "Should I be reading between the lines here...?"

Both Tank-Engines with armoured boilers. I may make other variations such as rams, minesweepers, etc.

So, read between the lines I did... And concluded that perhaps my Tank-Engines ought to be a little less comic and a little more, well, wargamey.

The result was that in a moment of madness, I sliced their faces off.

"Lord Thomson" with even more rivets! What a joy to behold!

It then occurred to me that I could have the best of both worlds - unbelievable silliness and, um, believable silliness. If I were to make new fronts for the engines on metal washers, I could magnetise them to make them removable.

Magnetised fronts are now interchageable.
 Hey presto! Interchangeable faces!

The work took about two hours and added a further 46 rivets to each vehicle, bringing their totals to 485 each! (Yes, that's 970 all up. Cool, huh?)

"Sir Percival"

I now consider the boilers to be armoured. Let's see if the Prussians dare...

Meanwhile, the Bazalgette Light Armoured Perambulatory Contrivance is close to completion. The first coat of paint has gone on and her rivet count is up to 414! More on that soon...

Keep watching, folks!

Two Thomson Tank-Engines flank the Faraday Galvanic Field Gun (and Big Mike)

All the Best!